Best Sailing Knives That Make You Confident On Board

Sailing comes with handy work like tackling stubborn shackles, and knotty ropes. A sailing knife is an essential tool that a sailor should own to help in their duties. In most cases, These knives are multi-functional. The best sailing knives are more than a water-resistant cutting blade.

Best Sailing knives
Best Sailing knives

This guide provides some of the knives available in the market today and things you should look out for when selecting one for you.

Fast Answer: The Best Sailing Knife

Camillus G10 Handle Folding Knife is my choice out of the selected best sailing knives. I like 2 more knives from Camillus and Old Timer for me. These 2 are Camillus Ti Marlin Spike Pocket Knife (bamboo handle) and Old Timer Folding Pocket Knife.

Brief Comparison For The Best Sailing Knives 2021

Sailing Knife Blade Handle Use Check On Amazon
Camillus G10 Handle Folding Knife VG10 Japanese super steel, 2’27” High-quality G10 handle Sailing knife Check Price On Amazon
Camillus Ti Marlin Spike Pocket Knife, Bamboo Handle Very hard & sharp, AUS-8 steel, 2’5” Nice bamboo handle Sailing Knife Check Price On Amazon
Victorinox  Swiss Multitool Large & wavy edge Strong and thick Multi-purpose Check Price On Amazon
Maxam Sailors Knife Sharp & plain Stainless-steel handle with a ruler Multi-purpose Check Price On Amazon
Five Oceans Rigging Knife Sharp & plain Stainless steel Rigging knife Check Price On Amazon
Davis Instruments Standard Knife Stainless steel sharp blade Stainless steel Rigging knife Check Price On Amazon
Meyerco Sailor’s Knife Stainless steel sharp blade Stainless steel Versatile knife Check Price On Amazon
Myerchin Generation 2 Rigging Knife Stainless, partially serrated, sheep foot blade Titanium handle, nylon belt sheath Sailor’s knife Check Price On Amazon
Spyderco Atlantic Serrated Knife Serrated & made of H-1 steel Safe grip, fiberglass-reinforced-nylon handle Sailing knife Check Price On Amazon
Sea Dog Rigging Knife 304 stainless steel, sharp blade Stainless steel Multi-purpose Check Price On Amazon
Phoenix Finds Treasures Rigging Knife Stainless steel plain blade Beautiful handle Sailing/rigging knife Check Price On Amazon
Old Timer Folding Pocket Knife High Carbon Stainless steel, 2’80 inches Safe handle Sailing/rigging knife Check Price On Amazon
Mil-Tec German Navy Deck Knife Stainless steel, 3-inch blade Plastic handle Sailing/rigging knife Check Price On Amazon
Navy Knife with Marlinspike made in England Stainless steel, 2’25” sheep foot style blade Stainless steel Sailing/rigging knife Check Price On Amazon
Marbles Black Knife High-carbon stainless steel Safe & beautiful handle Multi-purpose Check Price On Amazon
Antonini Nauta Blue Handle Knife 3’35’’, Hardened AISI 440A Steel HRC 56/58,

partially serrated

High-quality aluminum For nautical use Check Price On Amazon
Rough Rider Yellow Sailor’s Knife High-performance stainless steel, strong Safe and stylish handle Multi-use Check Price On Amazon

Features Of The Best Selected Sailing Knives

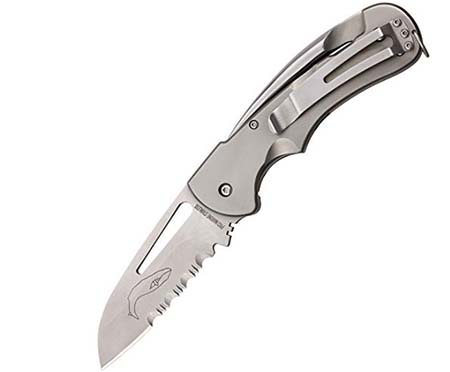
1) Camillus G10 Handle Folding Knife

This effective knife with a lifetime warranty comes with a marlinspike. The G10 handle and the VG10 Japanese steel make the knife a super working tool. The blade has a Carbonitride Titanium coating that protects from rust and corrosion.

Camillus G10 Handle Marlin Spike Folding Knife

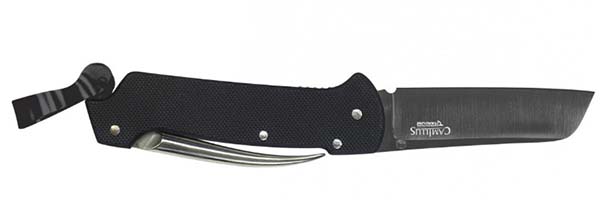
The steel is ten times harder than normal non-treated steel and that’s why the VG10 is known as a super steel.

Pros

  • Does not lose sharpness easily
  • Safe lock system
  • Great for nautical works
  • Super hard and durable

Cons

  • No disadvantage is observed

Check Availability & Customer Reviews On Amazon

2) Camillus Ti Marlin Spike Pocket Knife, Bamboo Handle

This is another knife by Camillus with a limited lifetime warranty. The beautiful handmade bamboo handle makes the knife an attractive one. It comes with a necessary rigid marlinspike.

Camillus Ti Marlin Spike Pocket Knife

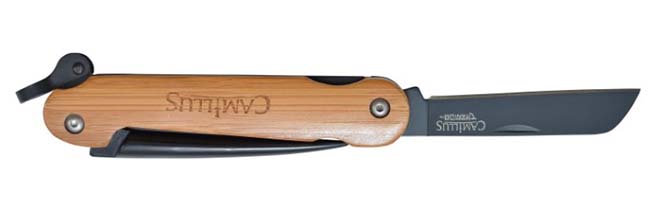
The blade is made of AUS-8, high-quality Japanese steel that keeps the blade sharp, hard, and rust-resistant. The Carbonitrite Titanium treatment makes the blade more perfect and durable.

Pros

  • Lifetime warranty
  • Super hard and durable
  • Beautiful handle with a great gripping surface

Cons

  • I do not see any problem with the knife

Check Availability & Customer Reviews On Amazon

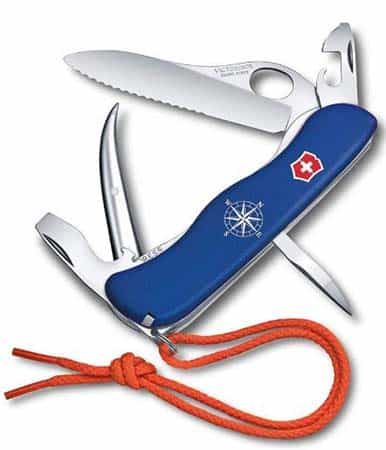
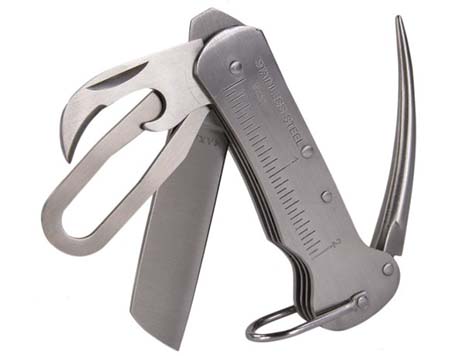
3) Victorinox  Swiss Multitool

This beautiful provides full capabilities in your hand. Measuring (1 x 6 x 9) in, Victorinox combines a lockable marlinespike and a lock blade for a nautical adventure. This model has a lustrous orange lanyard for visibility in stormy weather. The design also has a 3mm screwdriver, tweezers, keyring, can opener, marlinspike, lockable wire stripper, and a toothpick.

Victorinox Swiss Army Skipper Pro Multitool

Pros

  • Contains shackle opener and other useful tools
  • Gorgeous
  • Large
  • Has a lanyard

Cons

  •  Prone to rust if not well rinsed and oiled after use

Check Availability & Customer Reviews On Amazon

4) Maxam Sailor’s Knife

This powerfully effective knife features an easy/fast cutting access and thus suitable for hunting, fishing, and camping. It measures(3.8 x 1.8 x 0.8) in.  It comes with a bottle opener, shackle key, honed blade, stainless-steel handle, and a marlinspike and is excellent for rigging.

Maxam Sailor’s Knife

Pros

  • Compact
  • Multi-tool
  • Maintains a lustrous look

Cons

  • It may be too small in the hands of some users
  • The marlinspike might develop rough edges

Check Availability & Customer Reviews On Amazon

5) Five Oceans Rigging Knife

Made entirely of weather-resistant stainless steel, this rigging knife from Five Oceans is very useful and durable for many years of service. It also comes with a bottle opener, a sharp blade, a shackle key, a loop for lanyard attachment, and a marlinspike.

Five Oceans Rigging Knife

Pros

  • Affordable
  • Stainless steel

Cons

  • Some users found the flat blade unusable

Check Availability & Customer Reviews On Amazon

6) Davis Instruments Standard Rigging Knife

If a blunted blade is your preference, this rigging knife from Davis Instruments is an excellent choice. It is entirely made of stainless steel and includes a marlin spike, shackle key, and a screwdriver. It is also very affordable for sailors on a budget.

Davis Instruments Standard Rigging Knife

Pros

  • Affordable
  • Stainless steel
  • Blunted blade

Cons

  • The blade is pretty thin

Check Availability & Customer Reviews On Amazon

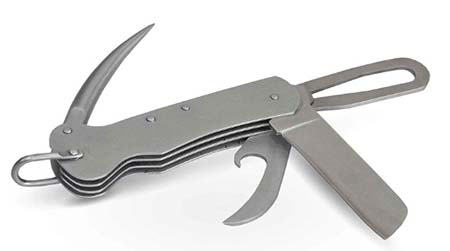
7) Meyerco Sailor’s Knife | Best Rigging Knife

Even with the marlinspike and blades adapted for marine rigging, this sailor’s knife is versatile for use on land. The design has a stainless steel handle featuring an engraved ruler. It also comes with a bottle opener, honed blade, spike, and shackle key.
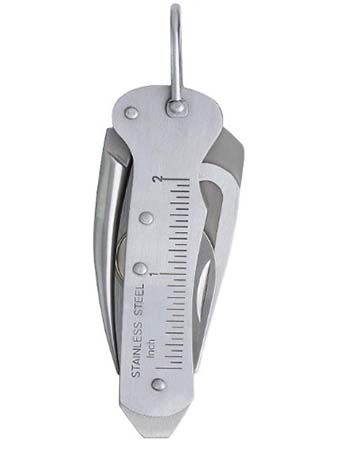
Meyerco Sailor’s Knife

Pros

  • Inexpensive
  • Well made

Cons

  • Blunt blades
  • Rusty with long exposure to salty water

Check Availability & Customer Reviews On Amazon

8) Myerchin Generation 2 Rigging Knife Review

This rigging knife comes with a serrated blade for easier rope cutting. It has a belt clip for accessibility outside your pocket. It is made from high-quality materials: Stainless pocket clip, and titanium handles. The design also features a marlinspike, a thumb slot, and a patented double lock.

Myerchin Generation 2 Rigging Knife

Pros

  • Durable
  • Hang packaged
  • Sturdy blades and spike

Cons

  • Some users found it less heft and not tight enough

Check Availability & Customer Reviews On Amazon

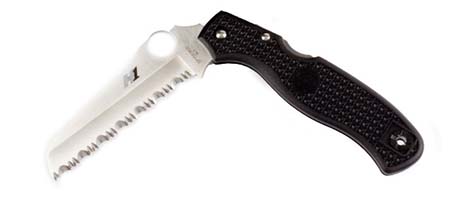
9) Spyderco Atlantic Serrated Knife Review

Made from H-1 Japanese steel, the Spyderco Atlantic knife gets tougher with use. It is rust-resistant and is tested for durability and quality. It has a hollow-ground serrated edge for safe and secure blade lock up.

Its handle yellow fiberglass for high visibility with a texturized pattern for better grip. This knife also has a titanium pocket clip to support right or left-side tip-up carry.

Spyderco Atlantic Salt Rust Free Serrated Edge Knife

Pros

  • Great gripping
  • Durable
  • Very sharp

Cons

  • No multi-tools
  • Too sharp for some users

Check Availability & Customer Reviews On Amazon

10) Sea Dog Rigging Knife

Ground from 304 stainless steel, this handy knife from Sea Dog includes a shackle key, bottle opener, sharp blade, a loop for lanyard attachment, and a marlinspike.

Sea Dog Rigging Knife

Pros

  • Affordable
  • Multiple usable tools

Cons

  • Prone to rust if not well oiled after use

Check Availability & Customer Reviews On Amazon

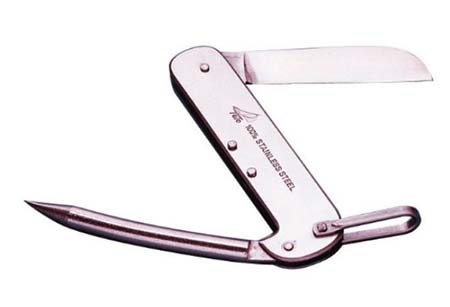
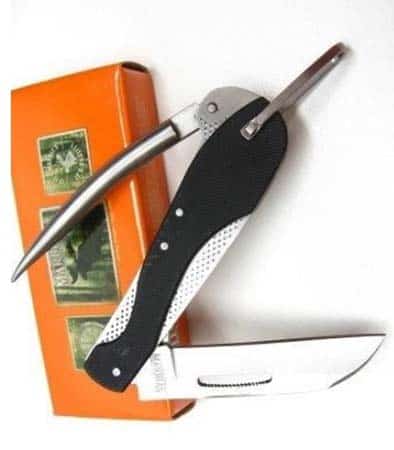
11) Phoenix Finds Treasures Rigging Knife

This vintage rigging knife from Phoenix Finds Treasures features one sharp blade and a substantial marlinspike to tie and untie stubborn knots. The blade is made of stainless steel.

PHOENIX FINDS TREASURES Kabar Rigging Knife

Pros

  • Easy to pop with one hand
  • Reliable

Cons

  • Needs oil application to avoid staining

Check Availability & Customer Reviews On Amazon

12) Old Timer Folding Pocket Mariner Knife

This elegant mariner knife is ground from 7Cr17 high-carbon stainless steel marlinspike and blade with nail pull. It features a saw cut handle with nickel and silver bolsters for an improved grip. This Old Timer knife also has brass pins, and it’s back springs are heat treated.
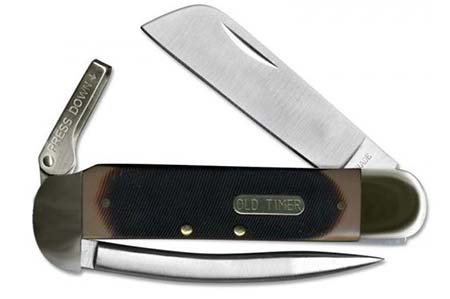
Old Timer Mariner Pocket Knife

Pros

  • Great quality for the price
  • Beautiful
  • Durable
  • Good grip

Cons

  • Marlinspike may need filing to be efficient

Check Availability & Customer Reviews On Amazon

13) Mil-Tec German Navy Deck Knife

The Mil-Tec Navy Deck Knife has a sharp stainless steel blade and a black plastic handle. It features an eyelet for attachment to equipment or clothing. It also includes a marlinspike which has a safety catch to protect the user from injuries.

Mil-Tec German Navy Deck Knife

Pros

  • Solid construction
  • The spike and blade lock tightly
  • Tight and well-rounded pins for durability

Cons

  • Some users reported flaws in the plastic handle

Check Availability & Customer Reviews On Amazon

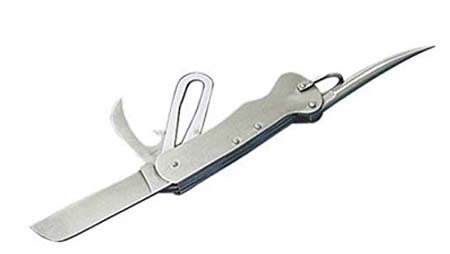
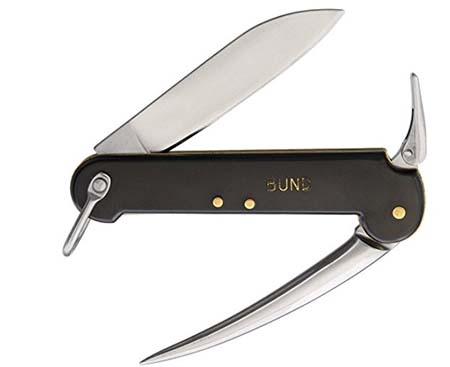
14) Navy Knife with Marlinspike made in England

The Ibberson, a reputable cutlery firm, makes this Navy knife, which is incredible for rope work. This knife is all-steel construction. The blade design is exceptionally strong. It has a steel shackle and a hooked blade suitable for ripping. The handle is engraved “British Army.” The knife also features rugged tools.

Navy Knife with Marlinspike made in England

Pros

  • Strong handle
  • Stainless steel
  • Rugged tools

Cons

  • No lanyard hole included
  • To some users, the engraving takes away from function

Check Availability & Customer Reviews On Amazon

15) Marbles Black Sailing Knife With Marlinspike

This unique knife is made from high-quality durable material. The blade made from stainless steel has more carbon for extra edge retention and hardness.

It also has additional alloys to stand unfavorable conditions and prevent corrosion. It is compact and safe to carry around. It has a strong marlinspike and is beautifully crafted. It has a loop to help with attachment.

MARBLES Black Folding Pocket Knife

Pros

  • The package comes with a free eBook
  • Durable
  • Sharp blade

Cons

  • The blade opens easily, so be cautious

Check Availability & Customer Reviews On Amazon

16) Antonini Nauta Blue Handle Knife

The Antonini brand has been manufacturing quality knives since the 19th century. This blue handle Marine Search and Rescue knife is no exception. Its handle is made of blue anodized aluminum. The blade is partially serrated and has a slot for easy opening. It also features dual locks. Other features include a lanyard hole, ¼ magnetized hex bit holder, bottle opener, and a marlinspike.
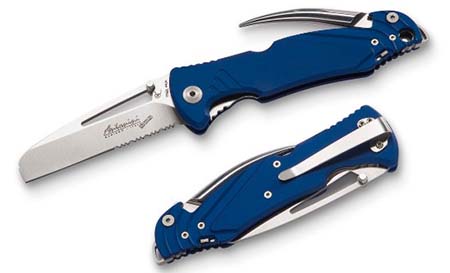
ANTONINI NAUTA BS Pro Marine Search & Rescue Knife Combo

Pros

  • Good grip
  • Easy to use
  • Long-lasting

Cons

  • Some users found it too small

Check Availability & Customer Reviews On Amazon

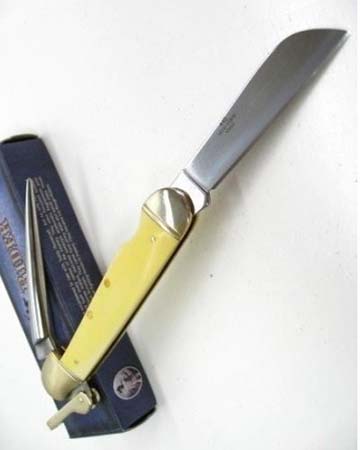
17) Rough Rider Yellow Sailor’s Knife

This stylish sailing premium pocket knife is ideal for self-defense, outdoor adventure, fishing, and camping. For excellent edge retention and hardness, the stainless steel blade contains more carbon. It has a marlinspike for roping and convenient usage. The yellow handle has a lanyard for easier spotting. It is great for emergencies and onboard maintenance. Every purchase comes with a free eBook.

ROUGH RIDER Folding Boat Rope Sailing Pocket Knife

Pros

  • Compact
  • Beautiful design
  • Sharp blade

Cons

  • Limited usable tools

How to Select a Sailing Knife

What makes a quality sailing knife? Here are tips to help you buy the right knife for sailing. Those who don’t know even the basics of sailing, also like to have a sailing knife sometimes. This guide is for all.

Blade tip

There are blunt and pointed blade tips. It depends on your style preference. Pointed blade tips could be dangerous on slippery occasions, but their puncture power is useful during an emergency. Blunted blades are safer but have less puncturing ability.

Blade Material

The weather at sea can be harsh, not to forget the salty water. It is crucial to buy a knife that can withstand these conditions. Cobalt, titanium, and stainless steel are the best corrosion-resistant materials.

Blade Lock

The blade lock holds the knife in a closed or open position. A proper lock keeps the blade in position to prevent accidental closing and thus injuries.  Sailing knives with lever locks are safer and easier to operate.

Blade Operation

À quality sailing knife has a pin, notched surface, or hole to open the blade singlehandedly. Without this, the knife might not be as efficient during emergencies

Blade Edge

The blade edges can be serrated, straight, or a combination of both. A straight edge allows even pressure throughout with less work. Serrated edges are ideal for quick cuts. Go for straight edges if you need clean cuts.

Belt Clip/ Knife Sheath

Some knives are not equipped with a belt clip or sheath. Those that do may have sheaths and belt clips that are not convenient and comfortable to wear. Belt clips are mostly attached to the hip, and the sheath is strapped to wet weather gear. It all depends on how you carry your knife.

Knife Grip/ Design

A proper sailing knife should be comfortable for holding. A handle that has a surface or texture offers additional comfort for a good grip. A good grip is crucial for use, mainly in wet conditions.

Ability to Cut

Can the blade cut through rope? This determines whether a sailing knife passes the test. The cutting ability is highly influenced by the blade design, the grip, and the sharpness, which is dependent on personal preference.

Extra Features

Some sailing tools come with additional tools for more versatility, such as shackle key, marlinspikes, corkscrews, and magnifying lenses. Ensure you check that the multi-tools are made of quality metals to avoid a jack-of-all-trades but a master-of-none tool.

Beauty & Style

If you have a stylish and effective knife you will feel proud and comfortable with your knife. It is always less recommended to work with an ugly tool.

Frequently Asked Questions

Is a knife a requirement in a boat?

To operate or sail any boat, a lot of ropes and rigging is involved. For easier rope management and cutting, a knife comes in handy in case of emergencies.

How do I determine the blade’s sharpness?

This can only be determined by testing. If you struggle to cut a rope, the blade is not sharp enough. It needs sharpening to perform effectively.  Customer reviews on the seller’s website are also a good guide.

How do I clean my sailing knife?

For most knives, cleaning only takes rinsing with fresh water. Check out the brand’s instructions for any special directions for caution.

Conclusion

The best sailing knife should be easy to use and reliable when its performance is required. This guide takes away the confusion and mystery associated with sailing knives. Paying attention to the knowledge provided above will help you buy the right sailing knife for your satisfaction.

A sailing knife is related to sailing, boating safety, and possible emergencies. Review your safety system and keep some of the boating distress signals with you. The best way to enjoy safe sailing is by having proper sailing education. The proper education will make you ready to face any sailing danger. The ASA (American Sailing Association) can make it easy for you. Have fun in the water!

Best Anchor For Pontoon Boat That Really Holds Tight

One problem that many people have when using their pontoon boats is that their vessels might start to shake around and move in the water even when they don’t want their boats to move. For this problem, the best anchor for pontoon boat is a calming solution. This is frustrating when you are fishing and you are trying to stay in the same position on the water.

Best Anchor For Pontoon Boat

This is even worse when there is a noticeable current in the water or if wind conditions might get a boat to start moving along gently. But today you have a solution for keeping your pontoon boat in a single spot.

An anchor can be attached to your pontoon boat. This can be lowered down into the water and can secure itself to the bottom of a spot in the water. It is one of the most indispensable materials you could even use in your pontoon boat.

Which Is The Best Anchor For Pontoon Boat? | Comparison Table

Anchor Weight (in pounds)Key FeaturesView On Amazon
Danielson River PVC Coat Anchor12 or 18PVC coatingCheck Price On Amazon
Slide Anchor- Box Anchor14/21/26 Box body folds out automatically when it gets in the waterCheck Price On Amazon
Lewmar Claw Anchor4.4 to 44high grade steel, great designCheck Price On Amazon
Danforth AMRD-94015.1 Fluke Anchor25The galvanized body offers a series of sharp pointsCheck Price On Amazon
SandShark Boat or Pontoon Sand Anchor 4Can be inserted near the shore to create a base for your boatCheck Price On Amazon
Deluxe Portable 8.5 lb Fluke Style Anchor kit8.5hot-dip galvanizationCheck Price On Amazon
SeaSense 74538 Navy Anchor 20Lb Vinyl Coated20 lbvinyl coated,
versatile
Check Price On Amazon

Top Seven Pontoon Boat Anchors Analysed

This listing includes a look at some of the great anchors for pontoon boats that you can use today. These include anchors that will secure themselves well onto the water floor and keep you from moving around when you don’t want to.

Each anchor is different based on its design and weight among other features, so it helps to look at a few special features that make whatever you are offering attractive and valuable.

Our top seven pontoon boat anchors are:

  1. Danielson River PVC Coat Anchor
  2. Slide Anchor-Box Anchor
  3. Lewmar Claw Anchor
  4. Danforth AMRD-94015.1 Fluke Anchor
  5. SandShark Boat or Pontoon Sand Anchor
  6. Deluxe Portable 8.5 lb Fluke Style Anchor kit
  7. SeaSense 74538 Navy Anchor 20Lb Vinyl Coated

Danielson River PVC Coat Anchor

Danielson River PVC Coat Anchor

The steel body of this anchor is appealing enough, but what makes this one of the best anchors for pontoon boat use is that it features a PVC coating. This produces a better amount of coverage that keeps the anchor from wearing out. This adds a smooth surface as well, thus making it easier for the anchor to grab onto the bottom of the water.

This does not have a rope, but it also offers a hole that gives you enough support for adding your own. This is flexible for making it so you can keep it as deep in the water as you might wish.

There are three flukes on this model. These are carefully curved with smooth bodies. This works well for 12 and 18-pound surfaces.

Pros

  • Smooth body
  • Heavyweight ensures your boat will stay intact
  • Easy to apply and use

Cons

  • Blades do not appear to be too sharp
  • Flukes do not fold inward

Slide Anchor-Box Anchor

Slide Anchor makes this pontoon boat anchor with a distinct shape. You will start using it by linking a rope to the end of the anchor through the yellow hole. After this, you will then throw it into the water.

Slide Anchor Box Anchor

The stainless steel unit will expand as it is in the water. The pointed flukes will ensure that the anchor will open up quickly and start working. This anchor is available in different sizes (baby, small and large).

When you use the anchor, the unit will be set within a foot of where it lands. This does well regardless of what the weather conditions in a spot might be like. You can quickly retrieve the anchor by pulling on the line.

Pros

  • Easy to apply the anchor into the water
  • Foldout motion works automatically
  • The strong body does not wear out

Cons

  • The pointed surface can hurt if you throw it improperly

Lewmar Claw Anchor

Lewmar Claw Anchor

This anchor by Lewmar is a versatile anchor that Works on different types of water beds. It can be used for a pontoon boat efficiently. High-grade steel construction and the effective design make it perform so well. Claw/Bruce anchor is great for sandy, muddy, or rocky bottom.

Pros

  • High-grade steel last long
  • Super design helps to hold strongly almost any bottom
  • Easy to set
  • Takes minimum time to set
  • Can be easily lifted out

Cons

  • Struggles with weed bottom

Danforth AMRD-94015.1 Fluke Anchor

Danforth AMRD-94015.1 Fluke Anchor

Look at this galvanized fluke anchor as the fourth to find as you search for the best anchor for pontoon boat needs. This anchor uses a strong steel body that can handle pontoons up to 40 feet in length. The 25-pound unit features wide flukes with galvanized steel bodies and sharp points.

The shank is also made with the same galvanized coating as the rest of the unit. This adds a strong design that offers a hole for supporting your own rope.

Pros

  • Heavy enough to support most common pontoons
  • Pointed flukes will not wear out over time

Cons

  • The hole for the rope appears to be too small

SandShark Boat Or Pontoon Boat Sand Anchor

SandShark Boat or Pontoon Sand Anchor

This next anchor works a little differently from the ones you have just read about. Sand Shark makes this as a model that you place in shallow water.

What happens here is that you will stick the stainless steel shaft into the water near the shore or in a shallow spot. You place it into the ground and then turn it around a few times to get the base to stick into the surface. Make sure you pat the surface down so that the anchor will stay in its place.

After this, you will add a rope to the top part of the anchor support. This rope should be long enough to bring you out to the spot you want to go to. When you read the end, the rope and anchor will keep you from moving forward.

Pros

  • Stainless steel offers a strong body
  • Foam handles make it easy for you to grab onto the anchor

Cons

  • Needs a strong foundation for it to actually work well enough

Deluxe Portable 8.5 lb Fluke Style Anchor Kit

Deluxe Portable 8.5 lb. Fluke Style Anchor Kit

MarineNow made this useful anchor kit using the hot-dip galvanization method which is great. The anchor weighs 8.5 lbs and can hold small boats.

Fluke anchor works well with mud, sand, or even with the weeds. The height and width of the anchor are 21.5’’ and 15 inches. The included anchor chain and the shackles are also well galvanized.

Pros

  • Good for calm conditions
  • Works great on soft and medium bottoms even with the weeds
  • It comes with an anchor chain (6.5 feet) and shackles
  • 98 feet anchor line is included in the kit

Cons

  • Not so good for the rocky bottoms

SeaSense 74538 Navy Anchor 20Lb Vinyl Coated

SeaSense 74538 Navy Anchor 20Lb

This vinyl-coated cast iron made anchor is a great choice for your pontoon boat. This works with most surfaces. But this is extraordinary with rocky and weedy bottoms.

The anchor is designed to combine the weight and flukes. This combination of this navy anchor makes it penetrate and grip the muddy and sandy waterbed.

Pros

  • This navy anchor works with different types of water bottoms
  • Easy to use and easy to lift the anchor
  • Great for maintaining in one selected spot
  • The SeaSense anchor looks gorgeous

Cons

  • The anchor is not for the big boats, choose the bigger one for a large boat

Buying Guide

Selecting the appropriate anchor when anchoring a boat is really very important. For primary choice, I give importance to:

a) Type of waterbed

b) Size and weight of the boat & the anchor

c) Type of boat or vessel

d) Possible weather conditions.

To understand the quality I should observe the following points:

Look At the Flukes

The flukes on an anchor will help keep a boat in its place. A fluke is a pointed material that will stick out from the base of the anchor. It can dig into sand or muddy surfaces and keep the anchor from moving.

A good anchor needs flukes that are sturdy enough to keep a hold on a surface while also being able to fold inward when the anchor is not in use. By folding into the center pole, the anchor can be easy to store without you losing control over how it works.

Weight

The weight of your anchor is a vital point to review. An anchor can be a few pounds in weight, but it can also be more than ten pounds if desired.

Look at how well the weight can be applied carefully and that it is even enough. Remember the size and the weight of your boat to select your anchor.

Physical Material

You must look at the physical material being used on the anchor to get an idea of what might work well for you. In most cases, galvanized steel is used for the anchor. This adds enough weight to make it move into the water well enough.

This is also strong enough to handle weather conditions and deep water as it will not rust or corrode. This may be useful for saltwater conditions where untreated metal might be hard to utilize.

Stainless steel is often used just as well. This is a little different in that it offers a better shine and is typically lighter in weight, but it should also handle salt water and most other conditions well enough.

Rope Material

Not all anchors for sale come with their own rope materials. But the ones that do should be reviewed well.

The rope or other material that your anchor is attached to should be sturdy and thick. Nylon and jute materials are often used in the construction of some ropes.

Whatever the case is, the rope must be thick and have a strong weave that will not break apart or tear quickly. Also, the rope’s weave should have small air pockets to where it will allow water to move through without impacting how the rope moves about in the water.

Not all of the best anchors for pontoon boat needs will come with ropes. But many of these models have their own holes that make it easier for you to secure the anchor onto something, which leads to the next point.

Rope Support Hole

The hole used for supporting the rope should be large enough to handle something strong.

It should be enough to handle a thicker rope that will not wear out. Check the size of the hole versus any rope you want to add to it, so you can figure out what is right for you.

Anchoring A Pontoon Boat

Anchoring a pontoon boat is similar to the other types of lake boats or any other boat. Steps should be:

a) Select the right anchor for your pontoon boat

b) Take the best anchor rode

c) Choose a good and suitable position for anchoring. Face and move towards the wind or current very slowly and then drop the anchor slowly and securely until the touching the bottom.

d) Then go back slowly with the current or wind. the right distance will be approximately 6/7 times the water depth of the position.

e) Don’t forget to tie the anchor to a deck cleat.

f) Set and check if the anchor is set or not by a small reverse power of the engine. Pull the anchor line to understand if the anchor is hooked properly.

g) We recommend using two anchors to avoid drifting.

Which is the best position to install an anchor on a pontoon boat?

The anchor should be dropped facing towards the wind or the current and the front of a pontoon boat is preferable. Now, the wind is always changing its direction and speed.

To avoid drifting I usually put another anchor at the aft side of the boat. This second anchor provides some extra security and peace.

Having an under-deck anchor is getting popular in some places which is not a bad idea. But having only one anchor will not prevent from drifting when the wind hits.

Frequently Asked Questions

What does it mean when a rope on an anchor is marine-grade?

The marine-grade rope is capable of being fully submerged in the water without wearing out or coming apart as it moves deep into the water. The rope should do well, but it should also move deep enough to where the anchor chain is placed.

A good rope will be resistant, not too rigid, and should not be weak in water. These ropes are usually made of nylon, polyester, or high-quality fibers which does not absorb too much water.

What types of materials will your anchor get into?

An anchor will more than likely get into sand or mud. The water floor should be soft enough to handle an anchor.

Will salt water conditions cause damages to a rope that an anchor is attached to?

Salt water should not hurt the rope, but you should at least look for something thicker and denser just to be safe.

How far deep can you get your anchor to go into the water?

The great thing about an anchor is that you can get it to go as far into the water as you want. But it might be hard for you to get the anchor to move into the water if you want to put it in a lower position.

How fast should the anchor move while under the water?

You should try to keep the anchor moving by a few feet per second to make it easier for the anchor to penetrate the water floor as you move it down.

How will you get the anchor out of the surface?

You would have to pull on the wire or rope to get the anchor removed. Of course, you would have to keep the motor or any other propulsion features on the boat off so the anchor will not accidentally lift itself out of the surface you have put it in.

Can you sharpen your anchor’s flukes if needed?

You have the option to sharpen the flukes on your anchor if desired, but the key is to keep their shapes intact. You do not want to change the overall appearance of the flukes in any way as they might not work as well if you modify them far too much.

Does the anchor have to be stored somewhere?

You don’t necessarily have to store your anchor in some space when you are not using it, but it does help to at least store it in some kind of bag just to keep it organized.

Conclusion

You must see how well any anchor you plan on using on your pontoon boat is arranged. The best anchor for pontoon boat use is often made to make it easier for a boat to stay intact in the water.

Take a look at how an anchor of value to you is laid out and how you can get it to work in any situation. Remember that there is a wide variety of anchors for you to choose from, but in the end, you will have to figure out a good option yourself to see what can come out of an anchor for your desires.

How To De-Winterize A Boat Step-By-Step

As the winter ends and the weather starts to warm, it’s time to start thinking about getting your boat ready for some fun-in-the-sun. If you have never de-winterized a boat before, or maybe you need a refresher to make sure you take all the right steps, then keep reading to learn how to de-winterize a boat, step-by-step.

Just as it’s important to winterize your boat before the winter months hit, it’s just as important to de-winterize it before you even put it in the water for the first time of the summer.

How To De-Winterize A Boat

Take The Boat Cover off

Remove the cover of your boat to start. During the winter, a variety of little critters may found their way under your cover and have been hibernating in your boat for warmth.

Give your boat a good looking over to make sure you don’t have any type of animals hiding out, like rodents or birds. A good, well-made canvas cover that fits snugly around your boat is the best boat cover. Even-so, there are some little critters that can still find their way in.

Check The Engine and The Propeller

Check your engine and propeller for any visible damage, corrosion or black suit from bad belts. Be sure to check all the belts for cracks and over-dryness, which can easily happen in cold, dry temps. Test your belts for a loss in slack by putting a little pressure on them. If they appear dry, cracked, or non-pliable; replace them. De-winterizing a boat engine is to check everything and don’t forget to do a trial run.

Check the engine and the propeller while de-winterizing a boat

Make sure your propeller is free of corrosion, dents and loose parts. It’s a good time to give in a good inspection while it’s out of the water.

Refill The Cooling System

You should have drained your cooling system before the winter and flushed it out. If so, now you’ll want to refill it using a 50/50 coolant mixture – 50% water and 50% antifreeze.

Be sure to check all the hoses and lines to be sure they’re in good condition; not brittle and no cracks that can mean, leaks. Replace any hoses or lines that are not in good condition.

Check The Water Pumps and Thermostats

An important part of keeping your engine cool is a rubber part on the impeller. It is said that at approximately every 200 hours of use, this part should be replaced.

If you know how many hours you have racked up, it may be time to replace that part. This part helps water flow down to cool your engine. Make sure your thermostat is operating so you can tell if your engine were to ever become too hot or cold.

Check Cables and Hoses

Bad cables or hoses can cause big problems if they happen to break or leak while out in the middle of the lake. Be sure to carefully inspect all the cables and hoses for cracks, leaks, breaks or disconnects.

If you have any questionable cables or hoses, replace them and make sure they are installed correctly to avoid inconvenient issues.

Inspect The Boat Battery

Batteries don’t do well when sitting unused too long, especially in cold weather. Your battery should have been disconnected for the winter, and now you need to make sure it survived the winter and is still good.

Start by filling with water and hook it up to a battery tester to make sure it tests positive for a charge. If it does, clean the battery by removing any corrosion you may see around the terminals. If your battery fails the battery test, obviously you’ll need to replace it.

Clean The Distributor

The proper way to check your distributor is to remove the cap and check for corrosion. Like the battery, cold weather can cause corrosion to build-up and it will need to be cleaned if you find any.

Make sure the spark plugs are in place and tightened, and remove the plastic bag or covering you may have put over the carburetor for the winterizing process, as well.

Check The Fuel System

Hoses and fuel lines are another part of your boat’s components that can take a real hit during the winter months. Give your fuel lines a good looking-over to make sure there are no cracks in the lines and all the connections are still intact and tight.

Be sure to look over the hoses in the cooling system and the connection clamps, as well. You should have left your fuel tank full when you winterized the boat, and a marine fuel stabilizer should have been added to keep moisture from building in the tank – something that can cause a lot of problems.

Don’t forget to check your fuel filter to be sure it’s clean and in good condition. If not, replace it with a new one. Any lines or hoses in the fuel system that have cracks or appear in poor condition should be replaced, too. All that’s left is to top-off your tank with fresh fuel to fill it up.

Check for Stiff Steering

Check your boat’s steering and power steering fluid level. If your boat is displaying stiff steering, it could be directly related to a low level of steering fluid.

If your steering fluid is low, fill the reservoir with the correct type of power steering fluid and to the manufacturers’ recommended level.

Inspect The Boat’s Exterior

Take a good look at the exterior of your boat. Look for any obvious cracks, dents or damage that you think could lead to further issues or even a leak.

One way to keep track of any dents or damage from year-to-year is by keep a diagram of your boat and notating any damage in the area you see it. You can write out how the damage happened, too, so you don’t forget year-to-year.

Check for Worn Belts

Belts can go bad during the winter; getting stiff, cracked, and they lose their flexibility if they sit too long. Make sure all the belts are in condition and replace any that aren’t. You can look for soot on the engine as a sign that a belt might not be working properly.

Inspect The Bilge Pump

There are three important parts of the bilge pump and they all need to be checked for proper function before venturing out. They include; the pump, the automatic switch, and the circuit. They work together, so one non-working part and it could cause you a lot of problems.

Once the water gets into the bilge, it automatically triggers the pump, which is why you don’t want any parts of the bilge to be on-functioning.

Do a Trailer Check

If your trailer isn’t working properly, you could risk big problems hauling your boat. Check it to be sure all the wires and and attachments are up-to-code. It’s illegal to drive a trailer without proper turn signals and non-working parts, so be sure to test your signals are working right and replace bulbs if needed.

Trailer Check for de-winterizing Boat

Don’t forget the tires and tire pressure. Add air or change bad tires, if you need to before you venture out with your boat.

Check That The Safety Gear is Working Or Not

Safety gear can get overlooked when de-winterizing a boat, but it’s important to be sure you have all your safety gear on-board, and it’s all operating properly. Life jackets, other flotation devices, flares, radios and other gear you have, won’t do you any good if they’re not in good shape or not working.

Clean Up Your Boat

No matter how well your canvas cover is made and fits, your boat will still need a good cleaning after sitting all winter, starting with the canvas cover itself. You should also do a thorough cleaning on all the vinyl seats, as well as the carpeting. If your boat has teak wood, you may want to spruce it up as well, with teak oil.

Paint The Bottom of The Boat

Now is a good time to get the bottom of your boat sparkly clean, free of gunk, mold or other things that take away from the visual appearance and maybe even the aerodynamics of the boat. After a good paint job, give your boat a good wash and wax to really make it shine for this year’s boating season.

There is a lot to know and do to make sure your boat is safe and operating at its optimum. You’re sure to have several questions about de-winterizing your boat, and here are a couple common questions you may have regarding de-winterizing a boat:

How Much Does It Cost to De-winterize A Boat?

The cost to de-winterize really depends on a few different things; mostly, the size of the vessel. The average cost is about $300, however, if you had a single, outboard motor, it may run about $100 to de-winterize the boat. On the other end of the spectrum, a large cabin cruiser could run in the upwards of $500-$600, and possibly more.

When Should I De-winterize My Boat?

There are some things you can get a little bit of an early start with, like removing your canvas and letting the boat air out, inspecting the outside of the boat and interior, and the such. This can be done in the early days of spring.

But when it comes to cranking the engine and activating the fluid systems onboard, you’ll want to be sure you’re past the point of a surprise freeze happening that can be damaging to the boat’s parts.

Can You Start A Boat That Has Been Winterized?

If you have taken all the recommended steps to winterize your boat, then you probably drained fluids and there may be some parts that are no longer in good condition if it’s been sitting a while, in the cold.

If you plan to start your boat after it’s been winterized, you will want to take the steps to ensure proper fluids are in place, as well as other de-winterizing steps that could risk harming the engine and other parts, if you don’t.

Is It Ok To Start A Boat Out Of The Water?

Boat engines require a source of water, so although you can start it and run it for a couple minutes for a quick test, you really need to have it connected to a water source, like a hose connected to the water intake vent, to safely run it while out of the water.

That being said, it is still very important to keep an eye on the temperature gauge to make sure the engine isn’t overheating.

Conclusion

In conclusion, in order to have a worry-free summer on your boat, make sure you follow all the recommended steps to de-winterize your boat before going out for the first time this season.

The more time you take and careful attention you pay to the details of de-winterizing your boat the right way, the more relaxed you’ll be, knowing your boat is in top condition for all the summer-fun you and your family plan to have out on the water.

Buying Guide Boat Shoes | 5 Things Not to Ignore

If you are planning a weekend in the water on a boat then definitely the question of what type of shoes you will wear will always come to your mind. Buying guide boat shoes will show you that it is not a difficult task. Obviously, you know that you can not go for some sandals or flip-flops to join the trip. The solution is, you need to pack useful and comfortable boat shoes.

Always remember a good pair of boat shoes are not only comfortable but they also help you to stay safe from slips and falls. If you have ever bought a pair of boat shoes for you just based on attractiveness, you will know how comfortable and adequate they are for such adventures.

Buying Guide Boat Shoes

In this article, you will find why boat shoes are important, and five things not to ignore while buying boat shoes.

For reading more specific shoe reviews and how-to guides, Shoefitpro will be helpful.

Why are Boat Shoes Important?

Boat shoes were invented by Paul Sperry in 1930. Most of his time was spent on the boat and kept on sliding on the wet boat deck thus he designed these shoes after getting tired of slipping again and again. From that day the shoes have become shoe brands for all the boaters around the world. These shoes offer traction cut into the leather shoe while you move around the rocking boat.

Just like you want your board to be geared up properly on the water for a day, similarly, your apparel has to be to the point as well. Boat shoes are going to be an important part of your adventurous day because from boarding the boat to walking on the wet deck, you are going to do everything.

Not only for the adventurous trip but you should always have a solid pair of shoes like boat shoes to protect yourself from any type of injury or pain, and helps you in moving around when needed. Not only do you need boat shoes but you also need a rain jacket, a good pair of sunglasses, and a high-quality hat to protect yourself from the sun.

See Our Buying Guide Before Selecting Boat Shoes

Many things should not be ignored while you buy boat shoes for yourself. Boat shoes play a very important role in the water trip plan. The wet floor will keep on making you get slipped again and again that’s why a strong pair of shoes views in moving comfortably.

Obviously, you can not risk sleeping and getting injured on your trip when you might not get a doctor’s attention nearby. That is why you need to get a pair of boat shoes for a safe journey. It will ensure boating safety and comfort as well.

Following are five things not to ignore while buying boat shoes.

The Flexibility of The Shoe

The very first thing you need to check is the flexibility of the boat shoes. You can check the flexibility by squeezing the sides of the shoes. If you are looking for shoes to be used in tough trails, then stiff boat shoes will be the best choice for you. 

You can also test the stiffness of the show by flexing the outsole with your hands. The shoes that are best for wet conditions always have an outsole that is quite resistant and helps you in walking comfortably. 

Shoelaces

Tightening of the footwear is a very important thing. That is why you should always look for boat shoes that have rings or hooks so that they can tighten your foot and you can walk appropriately.

The most common design of the laces is the leather lace that goes round to the back of the shoes and fastens your feet. For avoiding any kind of slipping or strain, your feet should always be firm while you walk. 

Shoe Upper

For carrying out the boat activities comfortably your shoes upper should be flexible enough. For easy movement, your shoe should protect your ankle and toes. For supporting the ankle the sides of the shoes should be high. 

For avoiding any kind of strain, please choose the shoe with a medium Heel cuff. For adequate support in the trip, always make sure that your boat shoes are stiff.

Shoe Sole

Always make sure that you choose a shoe with both outsole and insole made of good material. For rigid support of the outsole, it should be strengthened with stitching and Welts. Full movie from one end to the while you are in the boat your shoe should have additional rubber sole because the rubber sole provides necessary friction on the wet floor.

For good grip, the outsole should carry big treads. Always remember that if you know that you are going to spend more time near the water always go for the boat shoes that contain adequate cushioning.

Shoe Material

Boat shoes are made up of different types of materials, for example, leather, rubber, and plastic. The shoes are made up of leather material that is one of the highest qualities. These boot shoes are completely resistant to moisture and water. The leather material helps your feet breathe and remains dry all day long. 

The thickness of the leather used determines the durability of the boat shoes. Always remember if thick leather is used in the boat shoes they will always last longer. As well as for sailing and boating they provide durability and support to the feet. These Shoes use a leather lining that helps your feet to remain warm and you can enjoy your adventure.

Conclusion

Excellent boat shoes are always comfortable and fit well. Shoes should fit well because tight shoes shall make your feet feel uncomfortable all day long and shall put pressure on your feet. You can always find the best design and comfortable boat shoes.

The mentioned factors in the buying guide boat shoes should always be considered while you go for buying shoes for your trip. Shoelaces, soles, materials, etc. play a vital role for a strong and firm grip in areas around water and wet floors of the water. Thus always make a choice that is supportive and long-lasting.

How to Paint a Boat? Aluminum or Fiberglass

Do you want your boat always to look stunning as though as it’s new? If that’s the case, then you need not overlook the significance of applying fresh paint. Here’s an exhaustive guide on everything you need to know about how to paint a boat. And while applying paint might seem like a tedious task, it’s relatively easy.

How to Paint a Boat Fiberglass or Aluminum

All you need are some simple guidelines on the steps to follow while painting your boat, and in no time, it will be looking as good as new. If you’re prepared to undertake this process but don’t know where to start, you’ve come to the right place. With this, you’ll be in a great position to restore your boat to an excellent condition in no time.

10 Steps To Follow When Painting Your Boat

Painting your boat is a step-by-step process. You must follow all these steps correctly to ensure your boat’s look doesn’t get ruined altogether.

Here are the 10 steps to follow for painting a boat:

  1. Gather the tools and materials
  2. Prep your boat
  3. Clean your boat
  4. Remove all the hardware
  5. Remove the wax coating
  6. Mark the area you intend to paint
  7. Scrape off the peeling paint
  8. Sand your boat 
  9. Paint the boat
  10. Remove the painter’s tape

Gather The Tools And Materials

Before you can start painting your boat, make sure you have some useful tools and materials, including;

  • Putty knife
  • Mask
  • Paintbrush
  • Primer
  • Tape
  • Protective glasses
  • Paint roller
  • Epoxy filler
  • Dewaxing solvent
  • Rag or tack cloth
  • 80 to 120 grit sandpaper
  • Finishing sander or random orbital sander
  • Boat bottom paint
  • Topside boat paint

Once all these items are assembled, you can now embark on your boat painting journey, and here’s an overview of the steps to follow.

Prep Your Boat

This is undoubtedly the most vital part of the cleaning of your boat. Because of this, you need to take your time, and here are some of the activities that will be involved when doing all this.

Clean Your Boat

The first thing to do is thoroughly cleaning your boat. It’s best to do this immediately once you’ve taken your boat out of water because, at this point, it’s a lot easier to clean. And when doing the cleaning, make sure to use a high-pressure hose or wash together with rags and a scraper.

Once you’re almost done cleaning your boat, make sure to rinse it thoroughly and ensure no soap is left on your boat. And after a thorough cleaning job, you can be sure that sand, dirt, or hard growth won’t interfere with you achieving a clean paint job. How to clean a boat hull is a cleaning related article that could be helpful for you.

Remove All the Hardware

You must take out as much as possible to achieve a clean and smooth paint job. And although this might be time-consuming, it’s the only way to guarantee that your paint job efforts don’t go to waste. This step entails removing all the aluminum siding on your boat, but if there are hardware pieces that completely don’t come off, place a painter’s tape over them.

It’s essential to make sure that all the hardware has been removed because the paint will be on the boat’s hardware piece. As a result, this paint is more likely to allow debris and water to penetrate, which makes it start cracking over time.

Due to this peeling off paint and flaking, another paint job will be necessary, which is expensive and time-consuming. Therefore, you should avoid such possible issues in the future by thoroughly removing all the hardware from your boat’s surface.

Remove the Wax Coating

Paint or primer doesn’t stick to the wax. And because almost every boat comes applied with a wax finish, it’s essential to make sure it’s removed before applying the paint to avoid possible issues. If unsure whether your boat has a wax finishing, run your finger along the boat’s surface for a definitive answer.

When removing the wax coating, you need to use boat solvents. And as you do this, make sure to apply some pressure when using the coarse sponges to ensure all the boat’s wax has been removed. This might take your time, but you should only proceed once you feel no boat wax is left on the boat.

Mark the Area You Intend to Paint

It’s critical to identify the area that needs painting. This means inspecting dings, dents, and any other area where the paint is peeling or flaking. Once you’ve identified these spots, go ahead and mark each of them using a tiny piece of tape to make it easier for you to pick out the areas which you should address.

Scrape off the Peeling Paint

Once water and air find their way between the boat’s surface and paint, it causes the paint to start peeling. And this will continue happening even after you’ve applied a fresh coat of paint or primer. If you don’t want to waste your time and efforts, start by scraping off the boat’s paint. By removing all the peeling paint, you’ll be able to make sure it’s spread uniformly and well-adhered.

When the paint you’re applying differs from that of your boat, you need to scrub and sand off the entire pre-existing paint. You should do this using a sharp-putty knife and, while doing this, confirm the knife’s edge is parallel to your boat’s surface. By doing this, you avoid cutting the boat’s surface and making new dents, which is more work.

Sand Your Boat

Get 80-grit sandpaper and start sanding the whole boat surface. Doing this is essential since it improves the paint’s grip on the surface and facilitates the uniform coat of paint. When sanding your boat, there are crucial things you need to observe, including;

  • Never use a belt sander on the boat.
  • Completely stripping off the old damaged or flaky paint entirely.
  • Wearing eye protection and a respirator while sanding due to safeguard yourself from the toxic paint chops.

Paint Your Boat

The next to do after prepping and priming your boat is the paint job. Here’s an outline of the steps you should follow when painting your boat.

  • Use a rag to wipe your boat: You need to wipe away any loose dirt or dust that’s accumulated on the boat’s surface using a tack cloth after the primer dries.
  • Tape your boat’s edges: After wiping down the whole area, go ahead and tape along the boat’s edge of the topside and the waterline. And as you do this, always make sure to be using a long-mask tape. It’s advisable also to consider antifouling or to cover the region underneath your boat.
  • Go through the manufacturer’s paint guidelines: There are different kinds of topside boat paints. Therefore, it’s essential to review the manufacturer’s paint instructions before you can start to paint. Doing this is crucial since certain paints have specific mixing instructions while others need thinner. Thus, it’s evident that you need to always adhere to the manufacture’s guidelines before you can begin applying the fresh coat of paint.
  • Apply the first paint coat: Feel free to start applying the fresh paint after mixing the paints as advised by the manufacturer’s manual. You can choose to either apply the paint by brushing or rolling the topside coat, but first read the manufacturer’s manual to see if they recommend it.

When brushing or rolling vertically to the waterline, first ensure to start with a small area and take shorter strokes. And while rolling or brushing the paint, make sure to do this parallel to the finish’s waterline. Once you’re done, give the paint time to dry and then go ahead to other needed coats as advised in the manufacturer manual.

Remove the Tape

You should start taking out the tapes before drying the last coat of paint. Doing this is essential because leaving the final coat of paint to dry increases the chances of the paint to peel together with tape. Due to this, you’ll need to start the prepping and painting of your boat again.

Do You Have To Sand A Boat Before Painting?

Yes, sanding your boat before you start painting is a must. Doing this necessary to remove all the old coat of paint that might have flakes or loose material after water or air found its way underneath. 

If you don’t sand this surface before applying the fresh coat of paint, this loose material will remain on the boat’s surface. And over time, this will result in it starting to peel off slightly, meaning your hard-earned money and efforts painting the boat all go to waste.

Therefore, you must never skip this step if you’re committed to ensuring your boat gets to retain its impeccable look once you’re done painting it.

How Do You Paint A Boat Hull

One part of your boat that needs to be extreme care of when painting the boat hull. If you don’t observe this, the paint will start to peel off quickly, wasting your money and efforts. The steps to follow when painting the boat hull are;

  • Use a sponge to apply an industrial solvent to the surface of the boat hull
  • Clean the boat hull using power sand to get rid of old paint remains
  • Fix any existing flaws in the hull before using a roller to apply the primer
  • Use a painting brush and roller to apply the marine paint layer
  • Give the paint a few hours to dry

How Do You Paint The Boat Bottom

The area underneath your boat gest exposed to water and different organisms and growth. Because of this, it’s necessary to use different paint to that used when painting the boat’s top parts.

The paint to use when applying the areas under your boat have biocide, which is a type of copper that fades away over time. This boat bottom paint is essential in preventing barnacles as well as marine growth.

How To Paint A Boat Bottom

Here’s an outline of the steps to follow when painting your boat bottom:

  • Select the desired bottom paint: Due to the broad range of paints to apply underneath your boat, it can be confusing to pick the ideal choice. The main factor to consider when picking the most suitable one is identifying the region or climate you’ll use your boat.
  • Prepare and sand your boat: Like painting your boat’s topside, preparation, before you start painting the bottom side is essential. This entails removing all the peeled or loose old paint if your boat was already painted. If the bottom area wasn’t painted, there’s an additional step to follow, and for Hydro coat, this means applying 92 Bio-Blue Hull Surface Prep. However, this process differs from the painting product, so you need to go through the manufacturer’s instructions.

You should also sand your boat before applying the fresh coat of paint regardless of whether it had paint or not.

  • Apply the paint: Once you’ve adequately mixed the paint; go right ahead and apply it on your boat. And as you do this, make sure to continually stir it because some of the ingredients, such as cuprous oxide, usually settle on the container’s base.

How to Paint the Boat Deck?

You’re required to mask off the boat’s bottom part with an extreme care deck before painting it. When doing this, you should ideally use a 3M masking tape, which is the preferred option by many boat owners.

After you’re done, go ahead and using a solvent to get rid of all traces of dust and dirt on your boat. You should then thoroughly mix the paint using a high-nap roller. Once you’re through, please take off the paint and give it one to two days to dry.

What Kind of Paint Do You Use on a Fiberglass Boat?

There are three different types of paint you can choose to apply to your fiberglass boat. This includes;

  • Two-part polyurethane paints: If you want the best quality paint for your fiberglass boat, look no further. The two-part polyurethane paint looks the best and lasts for the longest period ensuring your boat retains its appeal. Nonetheless, their application is labor-intensive because they need specific humidity levels and exact temperatures to mix the primer. Also, they’re costly.
  • Single-part enamel paints: If you’re on a budget and searching for the best value, look no further since this paint offers you just that as it’s affordable. It’s also easy to apply. With that said, it has some downsides, including the constant need to be maintained and waxed due to its fragility when exposed to UV rays, which destroy its gloss over time.
  • Single-part polyurethane paints: These paints guarantee to last for long and are cheaper than the two-part polyurethane paints; this is the perfect pick. Due to their long-lasting gloss and affordability, they have become a popular choice for fiberglass boat owners.

How to Paint a Fiberglass Boat

There’s isn’t a lot that differs in how you paint a wooden and fiberglass boat apart from several details during prepping and application and the kind of paint used.

And for the best outcome, spray paint must be used instead of a roller or brush and for this task to be done by a professional. With that said, you can still paint your fiberglass boat, but you need to maintain extreme caution throughout this entire process.

The steps to follow when painting your fiberglass boat are;

  • Inspect the boat’s hull to see whether there are any holes or cracks and use putty to do these repairs. And while doing this, you also need to sand your boat to remove any rubber or silicone caulking and old stripes of vinyl graphics.
  • Apply a layer of epoxy to strengthen and safeguard the boat’s fiberglass surface.
  • Apply a primer layer and give it time to dry before sanding the surface.
  • Start applying ablative anti-fouling paint on your fiberglass boat.

How to Paint an Aluminum Boat

The popularity of aluminum boats has slowly been on the rise because they’re fun exploring water and inexpensive. But to best enjoy using this boat, you need to properly look after it to ensure it remains in excellent conditions, and this includes repainting it with a good aluminum boat paint after some time.

How to Paint an Aluminum Boat

The steps to follow when repainting it include;

  • Apply the paint stripper to help ease the hassle of removing the old paint on your aluminum boat.
  • Sand your boat to remove all the imperfections that might be on the surface. You can start by using 220-grit sandpaper and advance to achieve your wished polish level.
  • Thoroughly wash your boat using mild soap and water to remove all the dirt and dust. Once you’re done, make sure to rinse your boat correctly.
  • Proceed to apply the primer coat.
  • Once the primer dries, go ahead and paint at least two layers of aluminum coat.
  • Proceed to apply a clear protective coat once you’re done with the painting. This prevents scratches and ensures the paint remains undamaged.

Let’s Watch A Video On How to Paint An Aluminum Boat

Applying Non-skid Paint for Boat

The application of non-skid paint is essential to give it additional protection and ensure the boat doesn’t slip easily. But before doing this, you need to start by picking the right paint to apply to your boat. Here’s an outline of the different ways to apply non-skid paint on your boat;

  • Broadcast the powder using your hands all over the boat’s surface.
  • Stir the powder in the paint and then proceed to apply it. This technique is somewhat complicated because you’ll need to make sure the powder doesn’t bunch up when pressure is placed under the brush or roller, resulting in an irregular effect.
  • Drill several 3mm holes onto a plastic container on the lid and start using the container as a big pepper shaker. Do this until the entire surface gets covered with a powder layer.

What to See When Selecting a Boat Paint?

It can be quite confusing to decide which boat paint to pick with many options on the market. But to know which boat paint best suits you, there are a few useful tips to consider, including;

  • Identify the area on your boat that needs to be finished.
  • Determine the types of look you want your boat to have once you’re through painting it.
  • The manufacturer of the paint, primer, and every other compound needed. You should ideally use products from one manufacturer.

How Long Does Boat Paint Last?

How long does your boat paint last? The fresh coat of paint you’ve applied will inevitably start wearing off due to exposure to the harsh environmental elements.

You’ll start to notice the paint of your boat scrapping or peeling after four to five years. It really depends on your boat type, paint quality, use of the boat, type of water, boat storage, etc. And there are a couple of signs you need to be on the lookout for, including;

  • Peeling of paint on specific areas of your boat.
  • Craters resembling the look of a moonscape on the boat’s surface.
  • Blisters on the surface of your boat are caused by water getting trapped underneath the paint bubble.

How Much Does It Cost to Paint or Repaint a Boat?

The cost you incur painting your boat depends on a couple of factors, including;

  • The boat’s size
  • Difficulty painting the boat
  • The kind of materials needed
  • The degree of repairs necessary

If you decide to do the painting job by yourself, be ready to spend about $1,500. However, the average cost you’ll spend if you choose to hire a professional will range between $2,500 to $3,500 or more. And while you might be tempted to paint your boat on your own, it’s crucial to factor in various factors such as the energy, how challenging this is, and how much money you’ll spend.

How Long Does It Take to Paint a Boat?

The duration you take to finish painting your boat ranges between two to four days. How long this should take you also depends on your boat’s size and whether you encounter any interruptions when painting your boat, such as rain. But if everything goes smoothly, you shouldn’t take more than four days to be done painting your boat.

Conclusion

The process of how to paint a boat is one that many boat enthusiasts are always eager to know. If you also wanted insight on how to go about all this, reading this in-depth guide has been of great help. With these insights, you can now go ahead and paint your boat and ensure it remains in superb condition.

Lowrance Elite-7 Ti2 Review For Professionals

Over recent decades, technology has revolutionized the fishing landscape, making fishing sessions more effective, easier, and highly productive. The Lowrance Elite-7 Ti2 review will introduce you to one of the stellar gadgets that have made fishing easier and exhilarating. With cutting-edge technology, this gadget helps you to locate the best fishing grounds and find fish to reel in.

Lowrance Elite 7 Ti2 Review

Imagine a fish-finding device that promises not only to pinpoint where the schools of fish are but also comes with digitally integrated maps of various lakes, that can help you chart your way to higher potential areas with minimal ease.

No longer do you have to rack your head, trying to determine where to let down your net or bait. You can now get top-notch quality displays of fish within their hideouts in underwater drop-offs, ledges, and rapids up to 30 feet deep.

Well, this and more has been made possible with Lowrance Elite 7 Ti2, renowned and trusted fish-finding product manufacturer when it comes to deep-sea and shallow water fishing. Let’s dive right into this review.

Check Availability & Customer Reviews On Amazon

Features of Lowrance Elite 7 Ti2

1. Active Imaging

This gadget boasts of a formidable 3 in 1 transducer that enables CHIRP, side imaging, and down imaging.

CHIRP is the short form for Compressed High-Intensity Radiated Pulse. This technology operates by radiating a range of frequencies of varying strengths continuously. These frequencies are then translated into electrical energy forms and signals.

The immense data gathered is interpreted and displayed in clear cut images and details on the display screen.

Lowrance Elite 7 Ti2 Fish Finder Chartplotter Screen

Check Availability & Customer Reviews On Amazon

Some of the information displayed will include: high potential fish breeding grounds, how deep they are located, water temperature, ground speed, nearby vessels, and objects.

This helps you become more aware of your fishing environment and where you will set up for a ‘guaranteed’ catch. When you go for catching big fish or for finding a school of fish, This fish finder really works.

The 3 in 1 transducer has had a ground-breaking effect compared to its predecessors. Broadband sonars of the past only released single frequencies and thus the amount of data collected and information interpreted was limited. Previous units also only afforded limited imaging.

2. Genesis Live

This is another revolutionary piece that enables its users to update the mapping of their fishing spot and also map unmapped areas. Genesis Live allows you to take advantage of an ever-changing fishing site landscape.

Lowrance elite7 Ti2 Real Time Mapping

It appreciates that the best fishing grounds are not cast in stone and thus with further input of information, it can update the map to mirror the latest trends.

The movement of schools of fish is primarily determined by the depth of water and speed of the current. As these two determinants continuously change in various seasons and times of the year, so does the fish change their ‘breeding grounds’.

The Genesis Live helps you to be abreast with the changes at the given time of the year and thus have more productive fishing exploits.

3. Real-time Map Creation

While fishing, the Lowrance Elite 7 Ti2 continuously maps out your path and placement. This real-time map creation works hand in hand with the Genesis Live feature to ensure the maps developed are accurate and up to date. You are never left guessing.

4. Wireless Networking

The Lowrance Elite 7 Ti2 enables wireless sharing between elite Ti2 screens. This makes it easier to share fish routes, sonars, and maps as no cables are required to connect the devices.

This is especially helpful when fishing as a team in two or more boats or where you have two or more Lowrance gadgets on deck. The sharing is seamless and fast. There are little to no buffering hiccups and delays experienced.

The device also allows you to access your messages and see who is calling once connected with your phone or tablet device. However, the networking does not allow you to share your elite Ti2 screen with your tablet or phone.

5. Pre-loaded C-MAP for Inland Mapping (US)

The preloaded C-Map includes an astounding 4,000 lakes with 1-foot contours. These master maps make it easier when you go fishing on ‘new terrain’ and don’t quite know where to start. The lakes are map out in great detail, giving you all the information you may need to fish.

6. Excellent Display Technology

This Lowrance Elite gadget has a wide 7-inch SolarMax display that offers unmatched great clarity. With its high-resolution display, you get the see the vivid detail of water columns and schools of fish in the fishing ground.

Additionally, the gadget has great target separation. It helps you identify fish from covers the muddy bottom and other innate objects nearby your fishing site. You can also easily see your bait, sinker, and fish making the experience lively.

Who Can Use This Product?

This product is available for all who would want to have more fulfilling and productive fishing times. The young, the old, the pros, and the beginners.

The gadget has a pre-loaded C-Map for the majority of the US lakes, making it ideal for US citizens. However, if you are not in the US, maps for your local geography can be easily obtained by purchase from Navico.

Also, further updates of the Lowrance Elite Ti2 series incorporate additional (non-US) maps which you can change in the settings.

With all these amazing features, here is a quick list of the pros and cons of the Lowrance Elite 7 Ti2.

Pros

  • Excellent use of CHIRP technology
  • Additional detail such as water temperature and ground speed are included.
  • Easy to use user interface
  • Easy to integrate with a power pole or trolling motor
  • Great WIFI connectivity which allows you to easily download updated software
  • Faster Map refresh rate once updated
  • Wireless links between two same screens to share data
  • Does not greatly differ in functionality and structure from other earlier Lowrance Elite Ti2 models, making it easy to learn to operate
  • Fish reveal Smart Target view- this feature helps distinguish fish from other structures and cover.

Cons

  • Need to buy the right map for your area from Navionics or download some free maps from C-Map Genesis (if no pre-loaded C-Map for your area exists)
  • Occasional sonar 0.0.0. failure in some units rendering the entire gadget non-operational.

The Best Setting for Lowrance Elite 7 Ti2

Many individuals prefer various settings depending on their current fishing needs. It is therefore prudent to play around with the settings to see what is conducive for you.

However, the gadget delivers great results in its highest possible setting. In most cases, this includes, the highest possible frequency and the appropriate range.

If you would like to try out this setting, on the Menu Button on the screen set the:

  • Contrast at Auto
  • The frequency at 800Hz. This frequency setting gives you the highest possible resolution without limiting your range options.
  • Range – choose the 1st or 2nd level for greater details.

Choose a range that allows you to see the necessary details on the screen. If you pick an extremely wide range setting, you may not be able to see the fish and other objects floating nearby or close to your vessel

Frequently Asked Questions

Some of the popular questions about this device are here.

1. Does the gadget have a Chart Plotter?

Yes, the Lowrance Elite 7 Ti2 has an inbuilt chart plotter system.

2. Is the 3 in 1 transducer is compatible with carbon units?

Yes, the 3 – in 1 transducer is compatible with carbon units. To reap the best results update your unit to the latest software and buy the 3-in 1 active imaging transducer. Plug it in and play

3. What is the difference between a 2 in 1 transducer and 3 in 1 transducer?

A 2 in 1 transducer only provides side imaging and downward imaging, whereas a 3-in 1 transducer provides both side imaging, down imaging, and CHIRP active imaging.

4. What is the capacity of the transducer?

The 3 in 1 transducer supports medium and High CHIRP (83/200kHz) + 455/800kHz frequencies

What do people say about the product?

The product has done astoundingly well in the market with many of its customers giving it 5-star reviews. A particular review from a satisfied customer read ‘…what was I doing all this while?…’ and moved to explain all the benefits he had amassed from using the product.

However, some complained of the sonar 0.0.0. failure and defective unit head. Some even said the units are not as ‘quality’ as they used to be because of the same.

Lowrance Elite-7 Ti2 Update

Several other Elite Ti2 hardware upgrades have been released such as the Lowrance Elite 9 Ti2. This device not only has a 9-inch screen interface but has superior quality touch screen features and is not Geo Fenced.

UK citizens such as those from Canada can now access maps by utilizing the map setting Navico US/Can Nav+.

The company also releases software updates which are accessible through the app or can be downloaded online from their website.

Alternative Options

Other competitively priced devices that can serve as alternative options include:

Conclusion

Lowrance Co. has done it again, proving their expertise and efficiency in developing this product. The gadget is a worthy investment, given its superior features and quality outlook.

Check Availability & Customer Reviews On Amazon 

Motorguide xi5 Review With Pros & Cons

A trolling motor plays a vital role in boating, fishing even for kayaks. The Motorguide Xi5 Trolling Motor review will let you know everything about the Motorguide Xi series. However, it offers some reliable features compared to similar Trolling Motors on the market, and it’s quite efficient.

Something that makes this motor unique is the fact that it comes with plenty of power, varieties, and excellent features like the sonar, and Pinpoint GPS, among many others. Salt water and fresh water options make the motor a complete one.

Check Availability & Customer Reviews On Amazon

What is Included in the Product?

The good thing about the Motorguide Xi5 is that it includes plenty of useful features that make it easier to use and value for your money. The first thing you need to realize is that it enables you to choose between the thrusts, power options, and sizes. The GPS feature also included in the Motorguide has great digital technology to maximize battery life.

With the GPS on the Motorguide Xi5, you can easily set the course or anchor mode. You can also mount the hardware.

Features of the Motorguide Xi5

As mentioned earlier, the Motorguide Xi5 includes a lot of useful features, which we are going to highlight below. Check them out.

Thrust, Power & Size

When it comes to power, you can highly count on the Motorguide Xi5. Another thing is that it offers a variety of thrust and size options to choose from. It has 3 power options to choose from, and they include the 12V, 24V, and the 36V.

Keep in mind that every voltage is directly related to thrust. The thrusts include the 55 pound, 80 pound, and 105 pounds thrust motor. When it comes to choosing the motor’s thrust, you need to consider the size and weight of your boat. However, there’s also the alternative option of considering the voltage of the motor system in your boat.

There are also 5 different shaft lengths included for you to choose from. These shaft lengths range from 45-72 inches. Therefore, this provides you with an opportunity to select the one that is suitable depending on the size of your boat. You also have to consider the depth of the water where you will be fishing.

The power variations and peak thrust of the Motorguide Xi5 Trolling Motor are quite strong and have the ability to withstand strong winds and currents, to help you get to the destination without much strain. However, it is highly recommended to consider using the 36V-105 pounds thrust if you happen to go out fishing in areas with strong currents.

Durability and Guarantee

The Motorguide Xi5 is quite durable, since all the parts of this Trolling Motor are designed with high-quality material made to last longer. The shaft is made with composite material that can withstand hard hits.

That means the Xi5 has the capacity and strength to fight tough currents or hit various obstacles without experiencing any crack or breakage. Its high level of durability makes it worth the price it’s being sold at.

What’s more, it has a composite that features a marine-grade design houses all the electronics and crucial components to prevent any dust or moisture, thereby providing another layer of protection for the trolling motor.

The durability and features of the Xi5 Trolling Motor provide users with the guarantee of a high-quality product and efficiency.

Mount

The Motorguide Xi5 comes with a low profile mount that helps to reduce the bulkiness included in the trolling motor. This makes it easier for you to use the motor without the need to sacrifice on the power, stability, and speed.

Motorguide Xi5 Mount

Battery

Since this is an electric Motorguide, it is essential to consider its battery life so that you can be on the safe side. The Motorguide Xi5 has impressive power and durability. You can use the 105 amp hour trolling motor batteries which are able to last for a few days after which you’ll have to recharge them.

The trolling motor also has digital technology that helps to increase the efficiency of the battery by up to 50 percent. Therefore, when the battery’s efficiency is increased, this contributes to an increased lifetime.

It also comes with a digital display that enables you to track the battery power, so that you can know when next you need to recharge it. This eliminates any future issues of breaking down or finding yourself stranded after the battery has died abruptly.

Display, GPS, and Steering Control

When it comes to the steering and navigating features, the Motorguide Xi5 has some advanced combination of bearing systems and a protective rigid and housing shaft that provide increased efficiency and performance.

Therefore, when steering heavily, you can rest assured that this motorguide will keep you safe and protected. It also comes with a speed system with user-friendly controls that make it easier to steer the boat.

There’s also an included wireless foot pedal that you can utilize for controlling most of the functions on the Xi5 trolling motor.

However, the Motorguide Xi5 lacks a display but it connects to a list of fishfinder plotters through the NEMA 2000 unit. You can find a many compatible units from Lowrance. However, you need a transducer for mounting the motor for the advanced sonar features.

The trolling also has a reliable LED display that shows when the power is ON or Off, and even the battery life.

Thanks to the included GPS, you can easily anchor your boat in the right position, track your courses properly, and lock in the heading and speed. When you lock in the heading and speed, you’ll have time to relax and let the trolling motor do the work for you. That means it has autopilot and cruise control features that help to make your work easier.

Sonar

The Xi5 trolling motor come just a standard built-in sonar transducer that you can easily connect to a fishfinder that is compatible with it. But, you’ll have to use a NEMA 2000 connector cable, although the good news is that it is compatible with most units.

It’s a pretty decent transducer and functions properly in terms of imaging, although it doesn’t do any side imaging. What makes it efficient is that it has an advanced system which is better than not having any sonar in your motorguide.

Configuration

When it comes to configuration, you need to have a bit of knowledge so that you can properly use the Xi5 trolling motor. First, you need to learn about the deployment and mounting a trolling motor as well as the GPS and sonar.

Pros of Motorguide Xi5 TM

  • Durable and able to withstand tough currents
  • Great control permits to fish anywhere
  • A really silent motor permits to move without noise
  • It has a sonar transducer that is compatible with many brands
  • Efficient battery
  • Various sizes and power options to choose from
  • User-friendly
  • Reliable LED indicators
  • Affordable

Cons of Motorguide Xi5 TM

  • The battery is affected by the anchor mode
  • Peak thrust models have a gap
  • Lack of side imaging in a sonar transducer
  • You need to have a NEMA unit 2000 for connecting with the fishfinder

Other Alternatives to Consider

There are also other alternatives to consider on the market. One of the alternatives of the Motorguide Xi5 is the Garmin Force Trolling Motor, which is quite new on the market although it offers so much efficiency. Coming from Garmin, a top-rated manufacturer, this trolling motor is compatible with most electronic devices, has excellent features, and it’s also quite affordable.

The second alternative is the Minn Kota Ulterra 80. This is a top-notch motor manufactured by an industry leader in electric trolling motors. It comes with an auto-deploy feature and there are many accessories of the Minn Kota products available on the market.

Where to Use the Motorguide Xi5 and Who Is It For?

When it comes to using the Motorguide Xi5, it all depends on the type that you decide to buy. There is the option of buying the fresh water Xi5 or the salt water Xi5. The most recommended one is the salt water version because it has extra corrosion resistance which makes it quite durable.

The Motorguide Xi5 is ideal for a serious fisherman, and since it comes in various sizes and offers different thrust options, it’s considered the perfect choice.

What Do People Say About the Motorguide Xi5?

Our Motorguide Xi5 review focused on almost every side of the motor, the public opinion is always important.

Most people are satisfied with the motor. They think that the Motorguide Xi5 is an efficient trolling motor that is ideal for a fisherman ready for some great work. It not only offers efficiency but also comes at an affordable price.

Frequently Asked Questions

1. Do you need to have a separate battery?

Definitely! Although it comes with 2AA batteries in the foot control, you still need to have extra batteries in the boat in case they go dead and you’ll have to change them.

2. How do I use the anchor feature and does one need to upgrade the motor once you buy it?

The anchor feature is included in the GPS version, while the non-GPS version can easily be upgraded with GPS to provide the anchor feature.

3. Is the quick release bracket important when using the Xi5?

Yes! The quick-release bracket comes with the outer and inner plates. The inner plate is bolted to the boat’s deck, while the outer plate is attached to the inner one, which helps to eliminate any noise during movement. This is why a quick-release bracket is crucial when using the Motorguide Xi5.

Conclusion

The Motorguide Xi5 is an affordable, efficient, and reliable trolling motor to use in both fresh and salt water areas. If you are a serious fisherman, then this is an ideal motor to consider using for your next fishing escapade.

Check Availability & Customer Reviews On Amazon

Cost of Owning a Boat for Your Use

Do you enjoy spending time on the water? If so, the thought of buying a boat is one that must have crossed your mind at some point. Before committing to buy a boat, make sure to first fully understand the cost of owning a boat. But given the significant investment you’ll be making to committing to but a boat, it won’t be a surprise if you’ve got second thoughts.

Cost of Owning a Boat

It’s important first to understand the costs involved to consequently enjoy an amazing experience on your boat. By doing this, you’ll be able to use your boat for watersports, cruising, and fishing while having a good time with your family and friends. Here’s in-depth coverage of all the things to consider when buying a boat.

Buying A Boat Cost

One of the most important things you need first to ask yourself is how much the boat costs. Knowing this is important because boat prices vary greatly depending on its size, type, condition, age, options, or whether it’s new or preowned.

The guiding factor to consider is understanding how much time you’ll spend on water and the activities you enjoy doing. With this in mind, you’ll be able to establish which type of boat best suits your needs.

Many financing options are making your dream of owning a boat a reality due to their surprisingly affordable rates. The interest rate paid for a pre-owned boat is usually higher than that of a new boat. Don’t forget to make a buying a used boat checklist before buying these boats.

Furthermore, if you place more money, the less money that’ll be spent on interest.

Taxes

The taxes paid on buying a boat varies from one state to another. For example, if you buy a boat in South Carolina, you’ll be required to pay the tax that’s 10.5% of the boat’s assessed annual value if it has been in the state for over 180 days. However, you won’t be required to pay any taxes for buying a boat in Rhode Island.

Insurance

Having boat insurance is vital if you’re a boat owner. With one, you can be sure that your boat investment should it be stolen, damaged, or involved in an accident, your hard-earned money isn’t lost.

The amount of money you pay for boat insurance varies and depends on numerous factors such as your accident history, the boat’s value, and the type of boat you own.

Therefore, it’s mandatory to have boat insurance coverage unless you’re planning to use your boat on a private lake on your personal property.

This is especially vital considering close to 5,000 recreational boats each year are involved in boat accidents. Therefore, it’s clear that the expenses you might face from a boating accident might be enormous.

Registration

The registration cost of boats varies from one state to another. If you’re looking to register a boat in New Jersey, be ready to spend over $250 for a boat that is longer than 65-feet.

Mooring (Bigger boat/small boat)

Knowing how much exactly the cost of mooring is can be quite challenging as it differs depending on the nature of a marine and the region.

Mooring Cost of Owning a Boat

Therefore, you’ll need to set aside enough time to do enough research to know how much exactly it’ll cost you every season.

How much you need to pay varies from several hundred dollars every month when storing a runabout in a municipal marina to one thousand or more dollars each month for a huge boat stored in a yacht club.

Many marinas charge a slightly lower fee for a long-term lease as opposed to the monthly payment. You might also qualify for a discounted price for areas with cooler climates if you choose a winter om-site storage option. Therefore, it’s advisable to always factor in winter lay-up expenses when doing your calculations.

Boats that are stored on trailers are also are subject to a certain level of storage expenses. This is because most urban trailer-boat owners prefer to have their boats at a secure storage facility. By doing this, you save yourself from the risk of having to deal with vandalism or theft, hence saving you money.

Furthermore, you’ll spend more on fuel expenses if you reside far from a boat ramp due to trailing the boat back and forth, unlike storing it near the water.

Another vital aspect of mooring you must consider is ensuring the proper securing of your boat. By not doing this, your boat might break free or get banged against pilings, and this, in the long-run, might necessitate you to spend more money on repair cost.

Trailer is Another Boat Owning Cost

If you want a trailer to transport your boats, this might increase its buying price and, in some cases, is included as a package of the deal. It’s something commonly practiced by boat shows, dealerships, and at seasonal dealer sale events. This is usually done in cases when the trailer translates to sale conversion for the dealer.

The trailer needs to be maintained to ensure its overall condition doesn’t get ruined. This entails inspecting the brakes, tires, general maintenance, and monthly storage fee if storing your boat in the water isn’t possible.

Winter Storage

If you live in the colder climates, setting aside money for winter storage is essential. This is because you’ll need to do boat winterization prep for your boat and engine. In addition to this, you’ll need to buy a sturdy cover to safeguard your boat from winter winds, rain, and snow, which might destroy your boat.

If you choose outside storage of your boat in winter, the cost of shrink-wrapping your boat averages between $10 to $15 per foot. Therefore, you’ll have to spend between $200 to $300 for a boat, which is 21 feet.

For inside rack storage, you’ll need to pay a lot more as this provides your boat with improved protection from the elements. This means the cost per foot is $50, meaning for the same 21 feet boat, you’ll pay around $1,000 in preparation for winter.

Maintenance Cost will Always be There

The cost of maintaining a boat varies depending on its age and size. However, everything you need to shop to maintain your boat successfully is the same. This means the routine inspection of essential parts such as safety equipment servicing, engine servicing, sail, and rig servicing, as well as winter and anti-fouling.

It also entails the repair of one-off issues, including hull damage, equipment failures, engine problems plus upholstery, and interior wood repairs.

If you’re into doing DIY repair tasks, there are some maintenance stuff you can do by yourself. Nonetheless, there are other issues that you’ll most certainly need help from a qualified professional. With that said, you need to know that maintain your boat costs money as well as time.

Therefore, you must never ignore time management when organizing contractors, keeping lists, carrying out administrative tasks such as annual mooring, and renewing an insurance cover.

Oil/Fuel Changes

Many boats use plenty of fuel, meaning you need to be ready to spend a substantial sum of money than what you spend on your vehicle. For example, assume the price per gallon is $2.50, with this much lower than the actual rate in most places.

If you go ahead and use an average of 25 gallons of fuel per hour, which is the average for fast boast cruising at speed, you’ll end up spending $300 for a five-hour trip. This translates to over $16,000 per annum if you’re using your boat more than once each week.

If you own a slower pontoon boat, the amount spent on gas is a lot lower. This is because most use about five gallons each hour, meaning the annual fee cost will be near $3,000 for a similar number of hours cruising on the water. Therefore, how much fuel you spend on your boat depends on the speed.

Safety Items

When buying a boat, you must always factor in the safety gear, including paddles, life jackets, signal flares, and horns.

If you’re looking to buy extra accessories, you shouldn’t pressurize yourself into buying everything simultaneously. Instead, you should buy things gradually with an excellent plan to buy an additional boat accessory every fall and spring.

The most popular accessories you should look to buy include watersports towing equipment, stereos, lighting, among many others. As you buy these items, make sure to spend your money wisely, and consequently, you’ll be able to enjoy great fun on your boat.

Navigation Equipment

Are you planning to take an overnight trip or venture far away from the port? If so, you’ll need to factor in the price of installing a GPS when assessing the cost of owning a boat.

For a low-end GPS, you’ll need to spend at least $200. Nonetheless, if you’re on a tight budget, installing a GPS isn’t necessary and should instead focus on sticking familiar waters.

Education And Boating Licenses

All states require you first to get a boating safety and education certificate to get permission to use the boat. The set requirements differ from one state to another, but these boat licenses might be finalized online in many cases.

Furthermore, this online boating license or education in many of the states is done by a third-party, with the cost ranging between $29 to $50. You’ll only be required to pay this amount once you’ve managed to complete the course successfully.

These boat courses are meant to present information on all boating aspects with the goal not to make it difficult but to raise awareness instead.

During the course, you’ll learn about the state boating regulations, navigation rules, ways to enjoy watersports, boating terminologies, and basics and ways of handling boarding emergencies. You’ll also need to consider administrative fee, which varies across states.

Grand Total For Cost of Owning a Boat

Once you factor in all the costs mentioned above, it’ll be easier to determine the actual cost of owning a boat. Here’s a breakdown of the costs you’ll need to pay.

The buying price of the boat: $20,000

Taxes: This amount differs from one state to another

Insurance: $300

Registration: Varied rates

Dock or Mooring Fees: This cost differs.

Little boat: $500

Trailer: $1,000

Winter Storage: $2,000

Maintenance: $2,000

Gas: Free

GPS: $500

Safety Kit: $500

Grand Total: $26,800

You’ll need to spend a total of $26,800 when buying the first year of a boat. In addition to this, you’ll be required to pay for the maintenance of your boat, which includes maintenance cost, winter storage, and insurance. All these costs total to $4,3000, which translates to $358 each month.

However, this cost doesn’t take into account dock or mooring fees, registration, and taxes. Therefore, a total of $26,800 doesn’t show the actual cost of owning a boat, which is greater than this.

It’s thus evident that buying a boat is an expensive investment, even though the monthly maintenance cost isn’t that bad. Either way, you still need to do a lot of thinking before deciding to buy a boat to avoid causing yourself financial strain.

Conclusion

Knowing the actual cost of owning a boat is essential before you go out to buy one. If you didn’t know about the costs involved, reading through this detailed article has offered you useful insights.

Therefore, now that you know about all the costs involved, it’ll be a lot easier to make an informed decision about whether buying a boat is a practical decision.

Exit mobile version