The thrill of relaxing on the river is unlike anything else. The best inner tube for river floating is ideal for getting out and moving around on the water. You can get off of the shore area on a nice inner tube to head out to any lake you or river you want to get on.
You could also use one off of your boat if you want to get out a little closer to the water while sailing. Finding the best inner tube for river floating is always worthwhile as you can come across a model that gets you around quite well.

But as intriguing as an inner tube for river floating can be, you must watch for how it works. An inner tube needs to be sturdy and capable of handling whatever weight you add to its body. It should float well on the water and be made with materials that will not break apart. Of course, you should also have an inner tube that can handle any movements you make without possibly favoring one side.
This look at the choices you have for the best inner tube for the river will help you see what makes the market for such products enticing. You can benefit from getting a fine inner tube that is easy to inflate and use anywhere you want to go. More importantly, you might be surprised at the many things that go into producing an inner tube and how well it is capable of working.
Comparison For The Best Inner Tube For River Floating
| Inner Tube For River | Image | Circle Diameter (in inches) | Added Features | Check Price On Amazon |
|---|---|---|---|---|
| Intex River Run 1 | 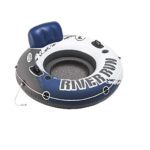 | 53 | Includes two cupholders | Check Price On Amazon |
| Intex 58837EP River Run II | 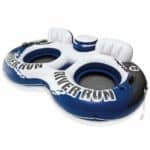 | 53 | Room for two people with added cooler in the middle | Check Price On Amazon |
| Tube Pro Orange 44-Inch Premium River Tube With Handles | 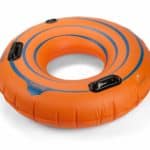 | 44 | Has two air chambers and two heavy duty handles | Check Price On Amazon |
| Tube Pro Green 44-Inch Premium River Tube With Cupholders | 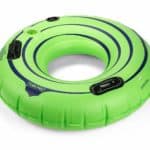 | 44 | Includes its own cupholder | Check Price On Amazon |
| Inter River Rat Swim Tube | 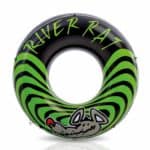 | 48 | Double valves for the two air chambers | Check Price On Amazon |
| Tube in a Box | 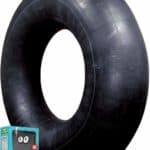 | 36, 40, 45 or 68 | Suitable for summer and winter use | Check Price On Amazon |
| CoolerZ Rapid Rider Inflatable Tube | 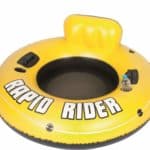 | 53 | Backrest, handles and cup holders all included | Check Price On Amazon |
| Water Sports Original ItzaTube 36-Inch | 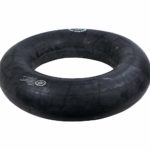 | 28, 36 and 45 | Thicker butyl rubber surface | Check Price On Amazon |
| Realtree MAX-5 Lake Runner X2 | 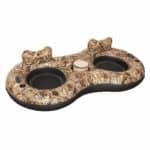 | 53 | Offers room for two people with a cooler in the middle part | Check Price On Amazon |

Features Of The Best Inner Tube For River Floating
This section includes some of the more popular products for the best inner tube for river floating. A few of these are made with one person in mind, but you can also find a few two-person models. Here are the top ten inner tubes:
- Intex River Run 1
- Intex 58837EP River Run II
- Tube Pro Orange 44-Inch Premium River Tube With Handles
- Tube Pro Green 44-Inch Premium River Tube With Cupholders
- Water Sports Original ItzaTube
- Inter River Rat Swim Tube
- Tube in a Box
- CoolerZ Rapid Rider Inflatable Tube
- Water Sports Original ItzaTube 36-Inch
- Realtree MAX-5 Lake Runner X2
1.Intex River Run 1


This is a single-person inner tube that comes with a 53-inch circle. It has a backrest added to help you feel a little more comfortable as you move along.
A pair of handles are built into the sides of the inner tube. These allow you to get a better grip on the tube. You can even find two cup holders on the sides near those handles.
A mesh bottom can be found around the circle. This offers a better seat to relax on while keeping you relaxed and cool. You don’t have to worry about lots of water getting in the way at this point.
Pros
- The soft body adds a comfortable surface
- Easy to grab onto
Cons
- Takes a bit to inflate
- The backrest does not feel too firm even when inflated all the way
Check Availability & Customer Reviews On Amazon
2. Intex 58837EP River Run II
Relax with a friend on this two-person inner tube. This is designed with a layout similar to the River Run 1 in that it features mesh seats and backrests plus handles and cup holders. The big difference is that this has enough space for two people. The middle console area also adds a nice storage spot where you can add different things in the middle as you see fit.
A popular feature that makes this a good choice for the best inner tube for river floating is its built-in cooler. This comes in the middle part of the float near the two backrests and even has its own lid. You can use this to add drinks and other items with ease. You would have to inflate the float all the way and then add stuff while on dry land to get the most out of this feature though.
Pros
- Includes five air chambers
- Cool and lid keeps things chilled quite well
Cons
- Be cautious with how weight is added; this can topple easily
- Could be subject to punctures from items placed in the middle
Check Availability & Customer Reviews On Amazon
3. Tube Pro Orange 44-Inch Premium River Tube With Handles
As the name of the product suggests, this is a 44-inch orange river tube that has a series of handles. These come with an air port located right on the top area with a smaller backup port on the other side. These two separate ports fill in the two air chambers perfectly.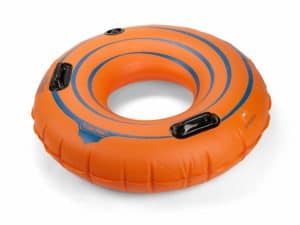

This is made with a heavy-duty PVC vinyl material. This allows for a comfortable seat that handles your weight well enough and will not sink easily.
Pros
- Handles are carefully welded into the body of the tube
- Air ports are easy to access
- PVC surface keeps you afloat longer
Cons
- The main port takes significantly less time to fill up than the other one
- No added cup holders or other features
Check Availability & Customer Reviews On Amazon
4. Tube Pro Green 44-Inch Premium River Tube With Cupholders
This is another Tube Pro product that has a similar seat with the same PVC materials as the orange product that was listed above. But what makes this different beyond the green color is that this model also comes with a cup holder. This can be found in between one of the handles and the main air port feature.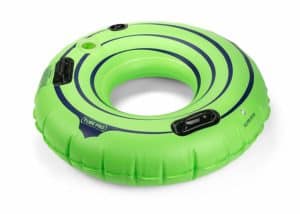

Pros
- The cup holder keeps the drink from slipping around
- Handles are carefully organized
- PVC surface is strong
Cons
- Takes an extra bit to fill
- The 44-inch body might be small for some
Check Availability & Customer Reviews On Amazon
5. Inter River Rat Swim Tube
Intex made this popular swim tube with a fun rat design on it. This has a 48-inch diameter and features a bold look. The grab line along the ends of the tube makes it a little easier for you to hold to while you cruise along. Two air chambers are also used with double valves all around for your protection.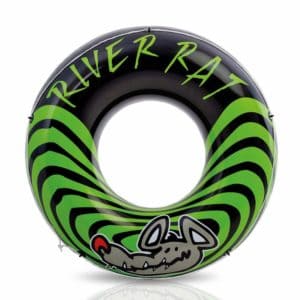
Pros
- The strong body is just a little under three pounds in weight
- Large diameter fits kids and adults alike
- Double valves keep air from moving out quickly
Cons
- Repair patch would disrupt the overall pattern on the tube
- Grab line might be easy to lose track of
Check Availability & Customer Reviews On Amazon
6. Tube in a Box
This next choice is relatively simple when compared to other choices for the best inner tube for a river. The Tube in a Box uses a sturdy vinyl body that resists UV rays. The rubber valve stem and cap are designed to keep air from leaking out of the tube as well.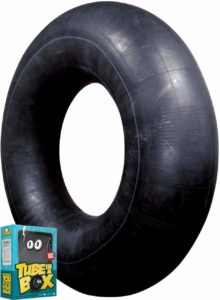

The tube is available in various sizes. You can get this in a 36, 40, 45, or 68-inch outside diameter.
You can even use the Tube in a Box during the winter season. It is thick enough to work as a sledding material. It does well with sliding around on the snow without tearing apart easily.
Pros
- The sturdy vinyl surface does not wear out fast
- Does well with motorized air pumps
- Handles almost every water condition
Cons
- Inner diameter shrinks as you inflate the tube further
- Maybe too heavy for some uses
Check Availability & Customer Reviews On Amazon
7. CoolerZ Rapid Rider Inflatable Tube
This is a 53-inch inner tube for river use that comes with two carefully welded handles on the sides. A pair of cup holders are also included with each holder located right next to the two handles. You can enjoy a nice backrest on the tube as well. The rest provides you with a comfortable surface where you can relax and enjoy a good ride.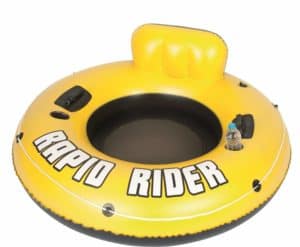

A net is also included on the bottom part of the tube. The net provides you with a nice rest to relax on without having to get wet. This is perfect when you’re going to get out on the river for a while and you want to enjoy a good time out on the water.
The grab rope along the side of the tube provides you with a surface to anchor things with. The grommets are all built into the inner tube.
Pros
- Cup holders do well with securing your drinks
- Hands are carefully secured onto the main body of the inner tube
- String on the ends provide you with a good control setup
Cons
- Added pressure onto the grab rope could be dangerous
- The backrest does not inflate as firmly as some might wish
Check Availability & Customer Reviews On Amazon
8. Water Sports Original ItzaTube 36-Inch
This choice is a butyl rubber inner tube that comes with a 36-inch diameter although you can get a 28 or 45-inch model if you prefer.

Pros
- Butyl rubber is thick and sturdy
- The seat offers a soft and smooth surface
Cons
- Heavier than most other choices at around five pounds
Check Availability & Customer Reviews On Amazon
9. Realtree MAX-5 Lake Runner X2
This last model to see when finding the best inner tube for a river is this fun two-person model that features a camo-like design. This uses a vinyl surface with a print pattern that looks like a natural brush, thus adding a fun camo-like style.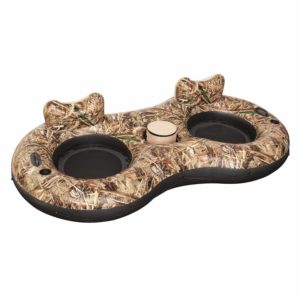
The unit features two cup holders plus a cooler bag. You can remove the cooler bag from the middle to fill it up and then put it in the middle. A lid is also included to keep the items inside of it protected well enough.
The mesh bottom surface will keep each person using it dry. The mesh materials also offer a cool surface for you to relax on while you are on the water. The comfortable layout provides you with a good experience you are bound to love.
This all comes with cup holders and handles on the ends of this model. The full design offers a great day for two on the water.
Pros
- Large body for the included cooler
- Cooler is well insulated with a well-fitting lid
- Handles and cup holders are firm and carefully integrated into the unit
Cons
- Takes a while to inflate
- Backrests are not too strong.
Check Availability & Customer Reviews On Amazon
Buying Guide
Weight Capacity
As you look for an inner tube, you will need to review the weight capacity. Anything that goes beyond the weight capacity will make the inner tube useless as the added weight would cause it to sink quickly. The best inner tube for river floating should have enough weight support for whoever it is that will use the inner tube at some point.
Material
The material that your inner tube is made of deserves to be explored in detail. The material can include a vinyl, PVC or rubber surface. These are all popular products for being thick and smooth. You can use a good surface to add a nice space to relax on while being easy to control and float along on, but you should watch carefully for how the material is laid out. You do not want to get on something flimsy.
What Will You Use It For?
Look at what you plan on using your inner tube for when finding a model to your liking. The best inner tube for a river should be one that can handle fresh and salt water surfaces alike. It should be something that lets you handle a gentle wave here and there as well.
Some models have cup holders and other features to let you relax on the water for a few hours. Others have simple ropes that let you pull small things around with you on the water. Whatever the case may be, look at how an inner tube is designed versus what you plan on doing with it. By reviewing these points, it will become easier for you to find something you are bound to have fun using and riding along with.
Look At the Inflation Port
The inflation port on the outside of the inner tube should be sturdy enough to allow air to get into the tube. A convenient air pump can be utilized to help you fill-up the tube quickly, but you would have to get that air pump separately.
Some older models work with you having to blow up the tube yourself by mouth, but it might be easier to use an air pump thanks to how convenient it can be for your use. Also, not all air pumps have to work with a battery; many of them can be operated by hand. Just be certain that you have enough room to get one of these pumps added into your cargo space well enough.
Is a Machine Pump Needed?
On a related note, you would have to look at the pumping needs that your inner tube has. Some tubes might need to be filled with a machine-powered pump that has a battery. This is the case for larger or heavier rubber tubes that might be a little larger.
Smaller tubes do not require you to use anything that intense. A basic air pump that you can control by hand should be good enough for many typical choices. Also, anything that has multiple air chambers and therefore more nozzles added to it should be filled with a hand-powered air pump as a stronger option might be a little too dangerous or risky.
Look At the Air Chambers
Most inner tubes will come with just one air chamber that will handle all the air that your unit requires. Some models may come with two or more air chambers, but that is for cases where more people can use a certain unit or if the layout is a little more elaborate.
Each air chamber should come with an inflation port. Look around to see how well you can use these ports.
Review the Valves
The vales on your inner tube should be reviewed based on how well they can be used. They should come with sturdy locks that keep you from putting in lots of effort to add air. But they should also be secure to where they will not be at risk of accidentally getting open while using you using them.
A valve should come with a body where a flap is on the inside part of the float. This flap will stay closed to keep air from coming out, but it will open when you add a nozzle for air into it. This ensures that air can go in while air will not move out.
For removing air, you would have to use a pinching motion in most cases. Sometimes you could add an air nozzle and press the release lever on it to allow the air to naturally move out. Either way, the air should only be removed based on when you feel it needs to come out.
How Many People?
You will typically find inner tubes with one or two seats. You should only use a two-seat inner tube if you plan on going out with someone on the water. You could cause the tube to topple into the water if you sit on it on your own without another person on it at the same time.
Review the Diameter
The diameter of an inner tube refers to how large the tube is when fully inflated. This goes from one end of the circular body to the next. This does not include the hole that you would sit in. A tube with a larger diameter does cover more space, but it also has a flat enough body to keep you from being likely to topple the tube and fall into the water.
How Is the Seat?
The seat in your inner tube can come with a good design featuring a mesh liner that keeps you from getting in direct contact with the water. Not all models offer this feature, but it is a nice convenience worth trying out for keeping you comfortable.
You may also find some drainage spots around the inner tube. These drainage features allow you to get any water that gets on the seat out. A drainage spot might be found on a small hole or another opening to the side of the seat. The space should be good enough to let water move out so you will feel rather comfortable while sailing along without getting wet.
Watch For the Repair Patch
A repair patch may come with your inner tube. This will let you seal off any holes or leaks inside the tube. The inner tube for river floating can include a patch that matches up with the design on the inner tube itself. But when using this patch, you must watch for how you apply it.
It may come with an adhesive surface that has to be applied perfectly for it to fit, and even then you would have to get a Refer to the FAQ section for details on how to add a patch to your inner tube.
Also, you might only get just one repair patch in your tube. When you have two or more holes or leaks in the tube, it should suggest that you need to get rid of that tube and replace it with a new one.
Entertaining Features
Some exciting inner tubes come with quality entertainment features that provide you with something fun that you are bound to enjoy. You can get on a tube that not only has handles and backrests among other items but also one that has cup holders. Such holders can work for cans or bottles that you want to tote around with you.
A model should have cup holders that can keep a tight grip on your drink without it possibly coming loose. The last thing you want is to have a good drink slip into the water while you are sailing along.
On a related note, a cooler may be included in some models. This could come in either an integrated cooler on one part of the unit or through a tray or open space that lets you add ice and other things. This is an attractive feature that provides you with a relaxing feeling, but it is best for you to watch how you use the inner tube when something like this is added. You don’t want to bear with water splashing all around the cooler.
Backrest Features
A backrest might be included on an inner tube. This would go on the back part of the tube and provide you with a surface that you can gently keep your back on. This would let you relax for a bit and have some fun while on the water. But you would have to watch for how much force you put on it though as an excessive amount could result in the tube tipping over.
The backrest might also come with a separate air chamber. This chamber would provide you with an extra bit of support for keeping the backrest filled up. Watch for how the backrest feels when compared with the rest of the inner tube though. Sometimes the backrest might not feel as firm or as comfortable as everything else.
Frequently Asked Questions
You must make sure when finding a great inner tube that you can identify what is on it. You must see how well the tube can work so you will feel comfortable with using it.
What do the age requirements for some of these inner tubes mean?
Many inner tubes have age requirements stating that an inner tube is best for people of a certain age or greater. These age requirements are recommendations based on a person’s approximate size. Some inner tubes are too large for children. Also, some inner tubes might be too small for adults but are sized just right for children.
It might be better to think about the size of the person who will get on the inner tube instead. Look at how well the tube is designed and that you can easily get in there without problems.
How should you let the air out of your tube after you are done using it?
You can always add a small amount of physical pressure to your inner tube when you need to let the air out. But you must also avoid being too rough on its body. Do not sit on the tube or step on it when allowing the air to release. Instead, open the air valve and then let the air out naturally. After a few minutes, you can roll up the tube. It should be easier for you to get the air out at this point.
What type of storage bag should you use when securing an inner tube?
You can keep the beer inner tube for river floating that you get protected inside a secure storage bag when not in use. But the bag should be large enough to handle the entire inner tube when it is fully deflated. Check the inside to see that the bag does not have any abrasive surfaces on the inside or any noticeable points. This is to keep the bag from being punctured while in storage.
How would you get a patch added to an inner tube?
The key to fixing an inner tube is to get any patches you have with it applied as soon as possible. You must still be cautious as you will require more than just the basic patch to get it all filled up right. You will need to use a few steps for fixing up an inner tube if you find a leak in its body:
Note: For the best results, take care of this process as soon as you notice a leak. It is easier to fix the leak when it is smaller.
- Wash off and dry the inner tube. Make sure any water that might have gotten into the inner tube has been dried out or removed.
- Look for where the leak is located.
- Appear a rubber cement solution around the leak.
- Allow the cement to evaporate. Try to do this when the air is warm and dry as the cement would dry up a little faster.
- Apply the repair patch to the inner tube. This should come with an adhesive that moves over the dried cement spot.
- Use a gentle vibrating motion on the patch area as you add it on the surface. This makes it easier for the patch to link up directly to the inner tube.
This should work for most repair patches. The specific instructions for your particular inner tube might vary. Check with the owner’s manual for your specific inner tube to get the instructions you need for handling a repair process on your inner tube.
Should you still wear a life jacket even when on an inner tube?
It is best to still wear a life jacket to protect yourself if you fall off of the inner tube for whatever reason. This is to simply help you to stay afloat if anything might happen with your inner tube.
Conclusion
The best inner tube for river floating can make for something fun to head out to the water with. Take a look at how well such an inner tube is made and how it is laid out. The appearance of an inner tube might be appealing, but it has to be comfortable and large enough to handle your needs. Be certain that your surface can be inflated carefully too.
Remember that going out with an inner tube can be a fun activity for all to love. Be sure you see how well your inner tube will work when making it ready for your use in any condition. This is all about producing a fine spot that you will love to relax in without feeling rough or otherwise uncomfortable with what you are entering into. Those who love other water sports & activities like boating, fishing, diving, surfing, or winter fishing, will love this river fun.